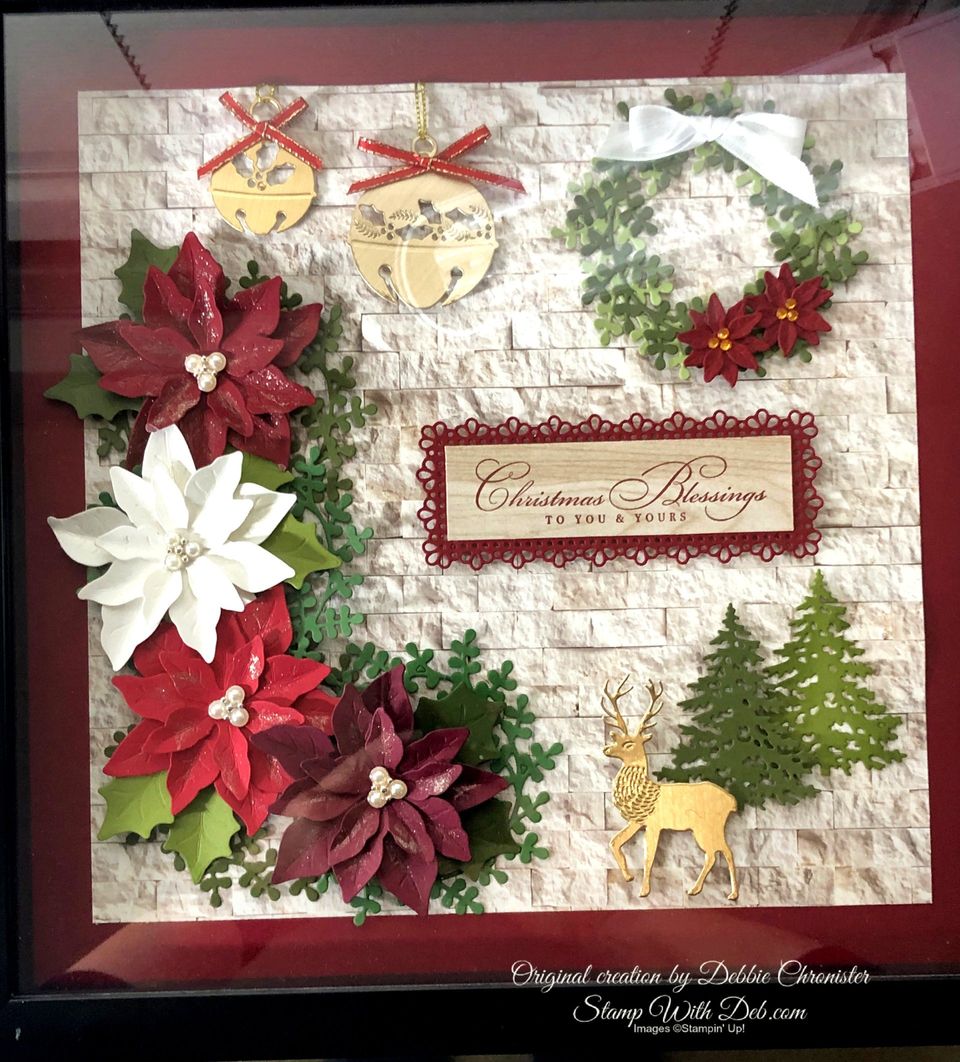
2020 CHRISTMAS FRAME
I have had so many requests to post this online. Every day three or four people are finding the group on Facebook and asking to join. So here is the information. I create online classes with kits and will continue throughout the year to create these frames. If you have drifted here from YouTube or Facebook you can order the kits for the upcoming frames. I have sold out of this one. If you are interested in ordering the products to create this frame, some of them are still available. I will include a supply list and a link to my Stampin' Up! Store, where you can order the products, at the end of this post.
Instructions:
Start with Cherry Cobbler 12 x 12 for the background
Cut 10 x 10 Brick wall from Word Of Good Designer Series Paper
Die cut Poinsettias, one of each of the 3 petals, from each of the following colors: Cherry Cobbler, Whisper White, Real Red and Merry Merlot
Color the petals lightly with Wink of Stella
Add a Beaded Pearls to the center of each flower
Adhere the flowers together by putting a dot of glue in the center of each of the two bottom layers layers
Die cut 4 old olive leaves and 4 Mossy Meadow leaves from the Poinsettia Dies
Attach the leaves to the back of the Poinsettias with glue dots
Die cut 4 Mossy Meadow wreaths using the Wreath Builder Dies
Start with the wreaths and adhere the four wreaths along the left side down around the corner
Adhere the Poinsettias on top of the wreaths using Dimensionals
Die cut the bells from Brass Foil using Sounds of the Season Dies
Attach a piece of gold cord to the top of the bell to wrap around to the back of the Brick Wall DSP
Tie a bow from the All the Trimmings Red Ribbon and attach to the bell
Attach the bells to the World of Good DSP using Stampin' Dimensionals
Die cut a Mossy Meadow Wreath using the Wreath Builder Dies
Die cut and Old Olive Wreath using the Wreath Builder Dies
Cut four of the small Poinsettia petals in Cherry Cobbler. Adhere together and add Holiday Rhinestones to the centers
Tie a bow from the Flowers for Every Season Ribbon
Die Cut the background for the sign from Cherry Cobbler using the Ornate Layer Dies
Cut 4 x 1 1/8 piece of the light wood grain DSP from the World of Good
Stamp the greeting from Wrapped In Christmas, in Cherry Cobbler on the wood grain DSP
Layer these two pieces together and adhere to the World of Good Brick Wall using Stampin' Dimensionals
Die cut two trees from In the Pine Woods dies, one in Mossy Meadow and one in Old Olive, trim the trunk on the bottom
Place them on the World of Good Brick Wall DSP overlapping, using Stampin' Dimensionals on the one in the front
Die cut the deer from Brushed Copper Foil using North Pole Wonder Dies and adhere using Stampin Dimensionals
I hope you enjoy creating this beautiful work of art. If you have any questions please do not hesitate to contact me.
Merry Christmas!
Are you about to hit that $99 mark on your order (before shipping and tax)? If so, why not consider joining my team? As a member, you’ll enjoy $125 worth of products of your choice for only $99! Plus, you’ll snag a fantastic 20% discount on all your future purchases and a variety of exclusive perks from me and Stampin' Up! Dive into this exciting journey of paper crafting with us! For more information, check out my Join My Team page
We now have 3 catalogs each year, January - April, May - August, September - December. We no longer have an annual catalog. You will find all of the products in the catalogs online as well as Last Chance and Online Exclusive Products. If you want to check out the May - August Catalog click on that catalog below. If you want a paper copy, please contact me to get yours!
Check out:
Online Exclusives
May - August Catalog - Contact me to get yours!
Subscribe to my My YouTube paper crafting video channel
Follow me on Pinterest
Follow me on Facebook every week for Stampin' Tell Tuesday
Shop my Online Store