A Bicycle Built for Two!

August 18, 2017

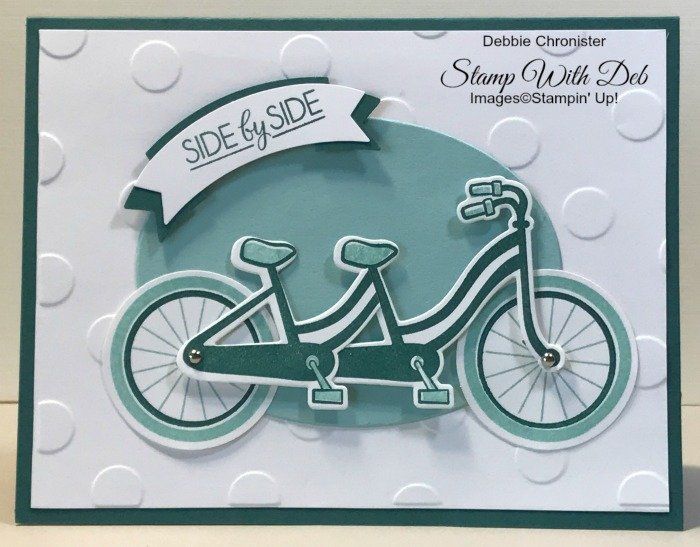
When I saw this bundle with the bike stamps and dies, I knew that it would make a bicycle built for two. I needed an anniversary card and it was the perfect stamp set for that!


STAMPS:
Bike Ride & Beautiful Blossoms

MATERIALS:
Tranquil Tide – 5 1/2 x 8 1/2 score at 4 1/4
1 1/4 x 3 (greeting background)
Whisper Whisper White – 5 1/4 x 4,
1 1/4 x 3 (greeting)
2 3/4 x 4 (bike frame)
2 3/4 x 4 (tires)
Pool Party – 3 x 4

INSTRUCTIONS:
-Die cut the Oval frame using the Layering Oval dies
-Pressure emboss the Whisper White with the Polka Dot Basics Embossing Folder
-Stamp the bike frame two times with Tranquil Tide
on the 2 3/4 x 4 Whisper White and cut with dies
-Stamp the seat, petals and handlebars With Pool Party
-Layer the bicycles together putting just a tiny bit of adhesive on the rear axle (on the stamped side) of the first bicycle. Layer the 2nd 
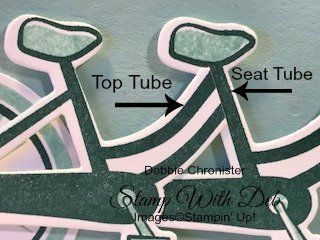
bicycle on top where you put the glue matching the petal to the axle. Adjust the bicycle so that the top tube (I had to look it up to find out what it is called) to the seat tube. Trim off the rest of the top tube, handlebars and front axle.
-Using a Paper Piercer poke a hole in the front axle and the back axle of the bike frame
-Insert a small brad and trim off any of the brad legs that show with scissors
-Stamp the outside tire with Pool Party on the Whisper White
-Stamp the rim of the tire with Tranquil Tide
-Stamp the greeting on the 1 1/4 x 3 Whisper White and punch the bottom banner on Duet Banner Punch
-Punch the top banner out of the 1 1/4 x 3 Tranquil Tide with the Duet Banner Punch – layer
-Put a NEW Mini Dimensional center of the tires. Adhere the bike frame to the tires by removing the back side of the dimensional.
-Glue the tires to the front of the card and remove the dimensionals you put on the back of the seats and handlebars


You can order any of the products you will need to duplicate this card from my website 24/7. Just click on the shop logo or click on any of the products below.

Happy Stamping!

Are you about to hit that $99 mark on your order (before shipping and tax)? If so, why not consider joining my team? As a member, you’ll enjoy $125 worth of products of your choice for only $99! Plus, you’ll snag a fantastic 20% discount on all your future purchases and a variety of exclusive perks from me and Stampin' Up! Dive into this exciting journey of paper crafting with us! For more information, check out my Join My Team page


We now have 3 catalogs each year, January - April, May - August, September - December.  We no longer have an annual catalog.  You will find all of the products in the catalogs online as well as Last Chance and Online Exclusive Products. If you want to check out the May - August Catalog click on that catalog below. If you want a paper copy, please contact me to get yours!

Check out:

Online Exclusives
May - August Catalog Contact me to get yours!

Subscribe to my My YouTube paper crafting video channel
Follow me on 
Pinterest

Follow me on Facebook every week for Stampin' Tell Tuesday
Shop my 
Online Store


916-420-0562

Email Me

By Debbie Chronister June 19, 2026
After a recent event I have 4 of these kits left. They include everything you will need to create these 5 amazing cards made with Nature Walk Designer Series Paper. The kits include the card bases, cut & scored, the designer series paper needed for the kit, all leaves have been cut. This kit includes PDF Instructions. To purchase this kit or others check out my store.
By Debbie Chronister June 17, 2026
This elegant fun fold card showcases the beautiful Framed Violets Bundle paired with the gorgeous 2026–2028 In Color Painted Patterns Designer Series Paper . The soft striped pattern provides the perfect backdrop for the delicate violet image, which was colored using Peaceful Pine and accented with a touch of shimmer from the Barley Blush Shimmer Brush for a subtle, luminous finish. The layered focal panel adds dimension and interest, while the sweet 2026–2028 In Color Butterflies bring a whimsical touch as they flutter around the floral image. A soft Barley Blush Ribbon bow completes the design, adding texture and elegance. This fun fold card is a wonderful way to showcase these beautiful new In Colors while creating a card that is sure to delight the recipient.
By Debbie Chronister June 3, 2026
This adorable Double Z Fold card features the charming Safari Smiles Bundle and is full of fun details and dimension. To create the ground scene, I incorporated the tree image from the Twisted In Time Bundle, adding the perfect touch of whimsy to the design. The soft cloudy sky was created using a homemade cloud template made from a retired Cloud Punch and lightly blended with Cloud Cover ink using a Blending Brush. The sweet elephants were colored with the Light Smokey Slate Stampin' Blend, giving them a soft and realistic appearance. Cloud Cover cardstock was the perfect choice for the card base, tying all the elements together beautifully. Be sure to download the FREE Project Sheet below for complete measurements, supplies, and step-by-step instructions to create this fun fold card yourself!
By Debbie Chronister May 31, 2026
It's time to start the 2027 Calendar! The first six months are ready! This is the first of a two part class, just to ease the stress of doing multiple calendars. This fee covers both classes. The second session will be October 1. If you live locally you can attend one of the classes I offer. One is in Lincoln, CA the other at my Studio in Citrus Heights. Please clear your calendar so you will have enough time to complete the pages. If you will be here during lunch please plan accordingly and bring a light lunch. If you do not live locally, you can purchase a kit to create the calendar. Please add shipping to your registration and if the amount is different, I will invoice to cover the difference.
By Debbie Chronister May 27, 2026
I created this fun and interactive Z Double fold card using the beautiful Balloon Festoon Bundle paired with soft Pool Party cardstock and the lovely Beautiful Ordinary Life Designer Series Paper for a fresh and cheerful look. The Z fold design adds movement and dimension, making the card extra special when displayed. I loved combining the festive balloon images with the soft patterns from the designer paper to create a playful celebration theme with lots of layered detail. The Pool Party color palette gave the project a light, airy feel while allowing the balloons, patterned paper, and embellishments to really stand out. This card was such a fun way to showcase both the unique fold and the versatility of the bundle and designer series paper together. The entire PDF Instructions for 18 alternate cards using the Pretty Party kit is available for purchase in my store along with other Tutorials & Kits.
By Debbie Chronister May 27, 2026
I had so much fun creating this cheerful card using the newly released Stampin' Up! Pretty Party Kit from May along with the beautiful Balloon Festoon Bundle . The soft colors and playful patterns from the kit paired perfectly with the festive balloon images and dies, making this card feel bright and full of celebration. I layered the elements to add dimension and finished it off with a few special embellishments for extra sparkle and texture. This combination made it easy to create a fun, happy card that would be perfect for birthdays, celebrations, or simply sending a little joy to someone special.  This kit is beautiful as it is but if you like a challenge and to do different things with the kits, you can purchase the tutorial for all 18 alternate cards on in my store.
Show More