
JANUARY 2020 CALENDAR
The January page uses two stamps sets that are already retired. If you want to do the calendar kit please contact me for an alternate design. It will be just as cute as this one. I had already created the design when the retired list came out.
What you need to do to participate:
- Place a $35 order (before shipping and tax) by January 31.
- Place your order directly through MY STORE . Do not select NO CONTACT when placing your order . If you do I will not be able to send you the calendar because, I will not be able to obtain your information.
- Each month (February - December) place a $35 order (before shipping and tax) before the end of the month in product I will send you one calendar page. If you would like additional calendars the cost is $2 each.
- The calendar base is wooden and they will be available in February. They are unfinished so you can finish them in the color you want or just stain them.
- I will send your pages once I receive an email from Stampin' Up! that you placed an order
- The Calendar Page kit will include any shapes, ribbons and embellishments and the pre-printed calendar ready to be stamped and assembled.
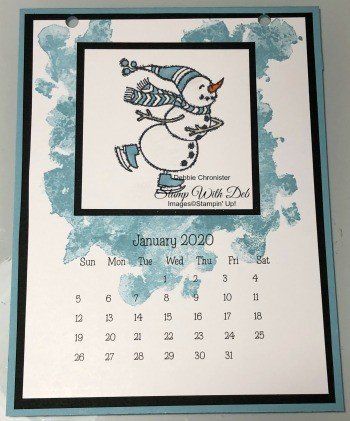
JANUARY PAGE
Note: the top of the calendar has been folded over and the Basic Black has been adhered. This was done for you so that I could go ahead and punch the holes for the rings on the stand.
Stamp the Whisper White with the background stamp from Beautiful Blizzard in Balmy Blue ink
Stamp the ice skating snowman from the Spirited Snowman. You could use any of the snowmen from this set. Just remember to purchase the necessary Stampin' Blends if you decide to use one of the other ones
Color the snowman with the Stampin' Blends
Adhere the Snowman to the small Basic Black cardstock
I used dimensionals to adhere the small basic black to the calendar page
Attach the Whisper White calendar page to the base page
This month is really simple I hope you enjoy getting off to a easy start.
Are you about to hit that $99 mark on your order (before shipping and tax)? If so, why not consider joining my team? As a member, you’ll enjoy $125 worth of products of your choice for only $99! Plus, you’ll snag a fantastic 20% discount on all your future purchases and a variety of exclusive perks from me and Stampin' Up! Dive into this exciting journey of paper crafting with us! For more information, check out my Join My Team page
We now have 3 catalogs each year, January - April, May - August, September - December. We no longer have an annual catalog. You will find all of the products in the catalogs online as well as Last Chance and Online Exclusive Products. If you want to check out the May - August Catalog click on that catalog below. If you want a paper copy, please contact me to get yours!
Check out:
Online Exclusives
May - August Catalog - Contact me to get yours!
Subscribe to my My YouTube paper crafting video channel
Follow me on Pinterest
Follow me on Facebook every week for Stampin' Tell Tuesday
Shop my Online Store