DIAGONAL JOY CARD

February 2, 2022

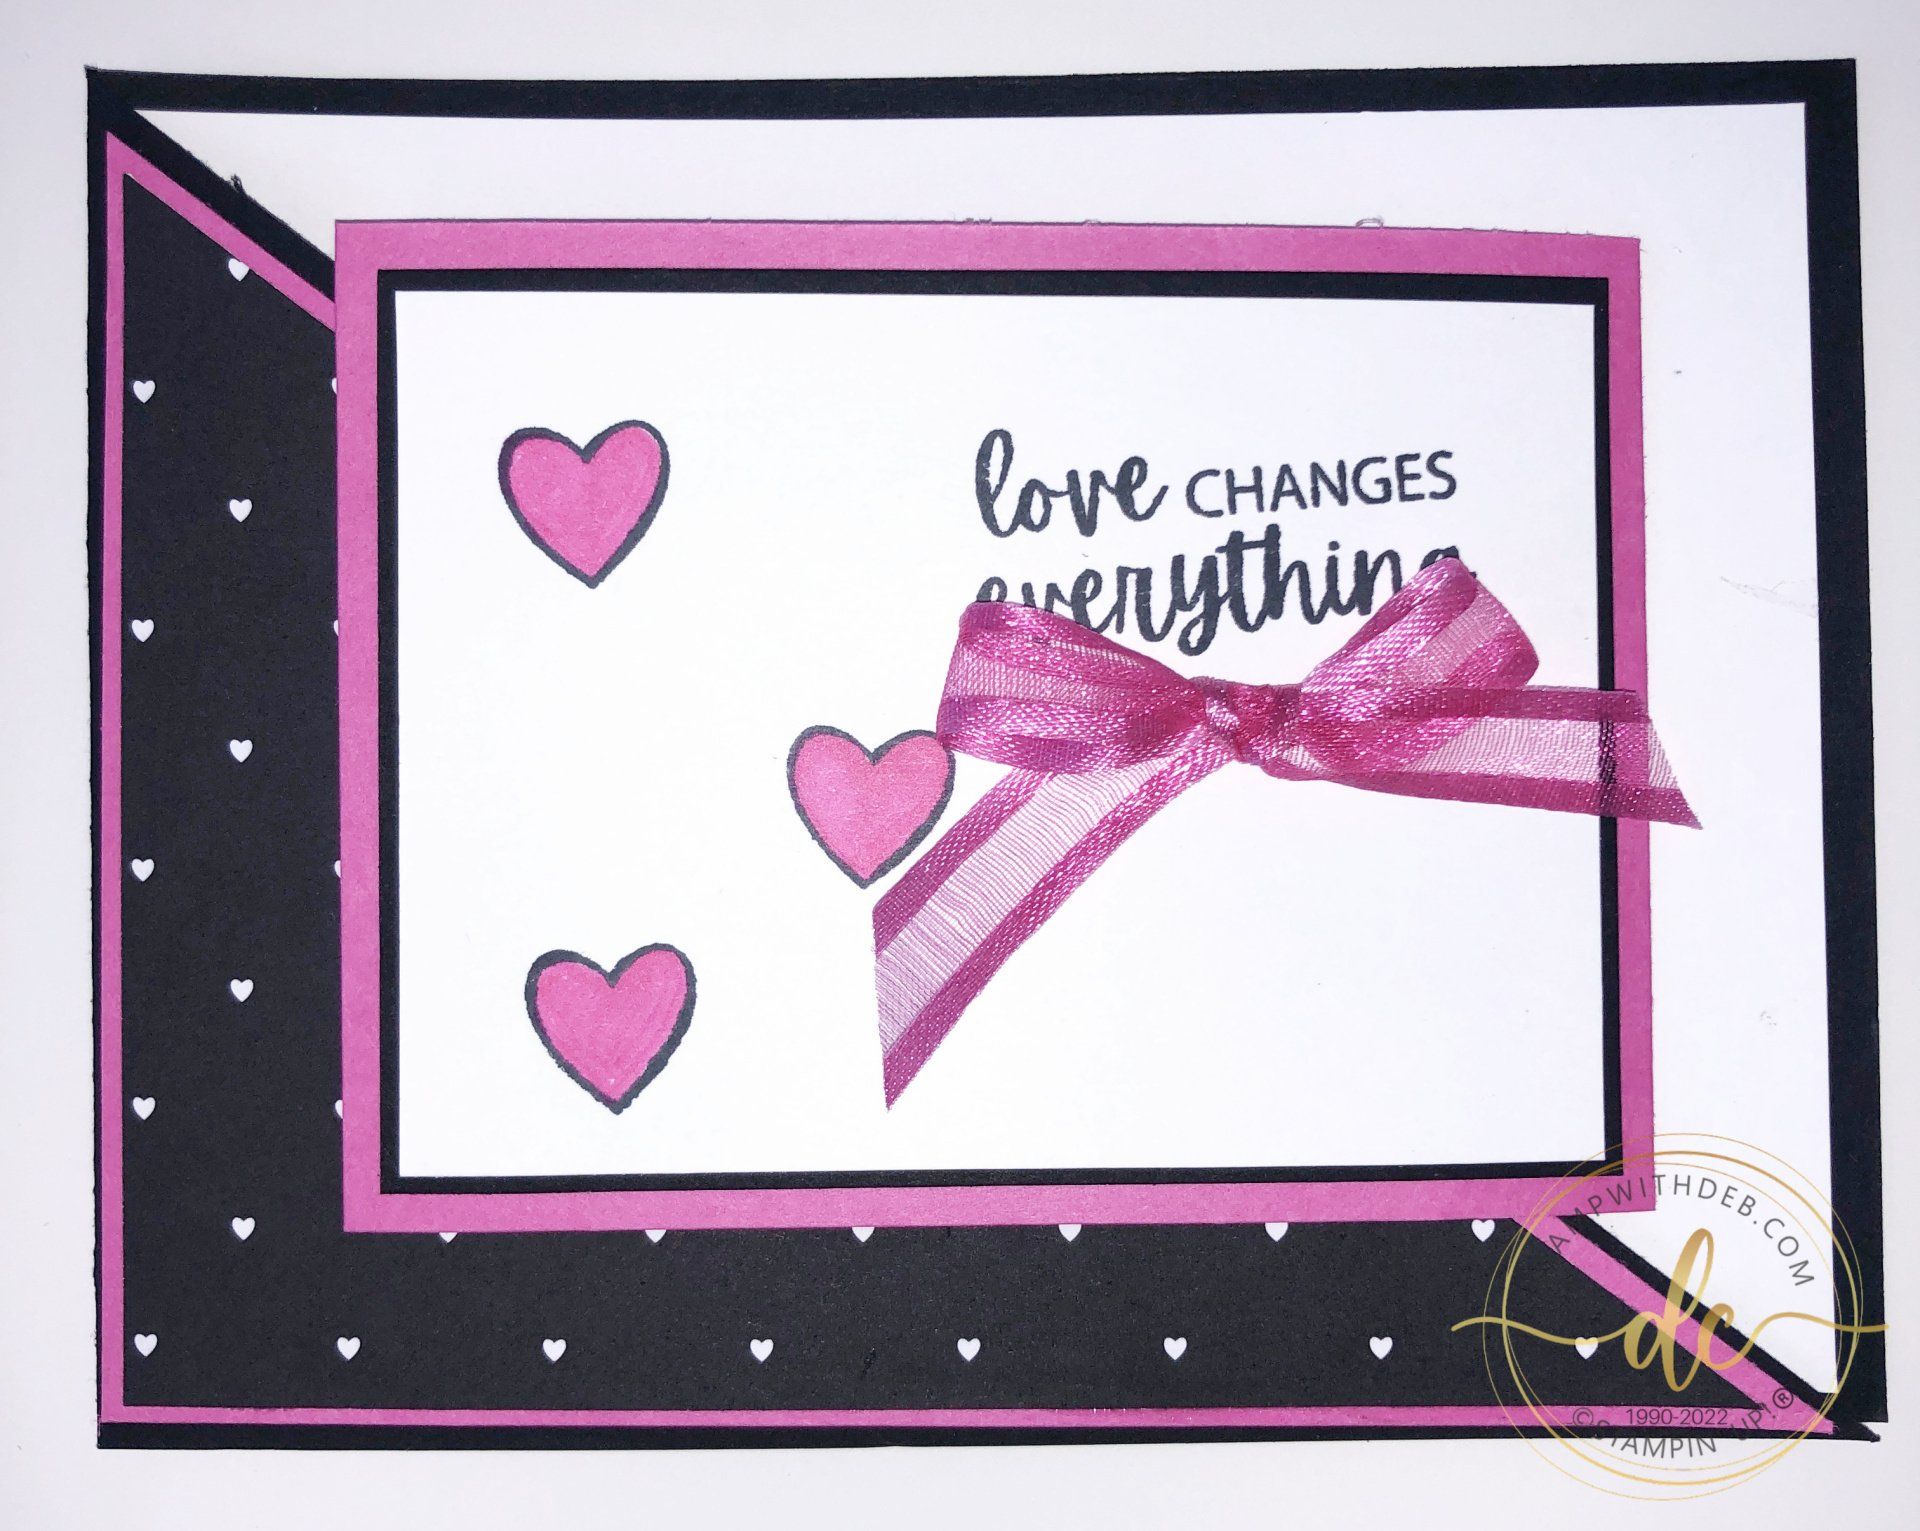
This card is a combination of two cards that have been around for a long time. The Diagonal cut card which can be done several different ways and the Joy Fold card which is usually a backwards card inserted into another card base. The Joy Fold has always been a standby card for me. When I am using a stamp set and I am stuck what to do with it I always fall back on the Joy Fold and it always seems to work for me.


MEASUREMENTS:

  • Cut 4 1/4 x 11 Basic Black, score at 5 1/2, cut from top score line to bottom right corner on the front of the card
  • Cut 4 x 5 1/4 BasicWhite, adhere to the inside of the card
  • Cut 4 x 5 1/4 Magenta Madness, with card in landscape position cut from top left corner to bottom right corner, this should fit perfectly because you cut the card 1/4 inch smaller, so following that would come the DSP, adhere to the front flap of the card
  • Cut 3 3/4 x 5 BRAND NEW! All Together DSP, watch your images! the 5" side should be on the side of your images, cut with the images right side up and the desired side facing you from the top left corner to the bottom right corner, adhere to the Magenta Madness
  • Cut 3 x 8 Magenta Madness, score at 4, adhere to the inside so the fold is on the right, centered on the Basic White, but make sure your able to close the diagonal flap
  • Cut (2) 2 3/4 x 3 3/4 Basic Black, one goes inside the Joy card portion, one goes on the outside
  • Cut (2) 2 5/8  x 3 5/8 Basic White, one goes in side the Joy card portion, one goes on the outside. On the outside one I stamped the heart and greeting from Here Together Stamp Set
  • Tie a bow with the Polished Pink Open Weave Ribbon. It is amazing at how close that looks to the Magenta Madness


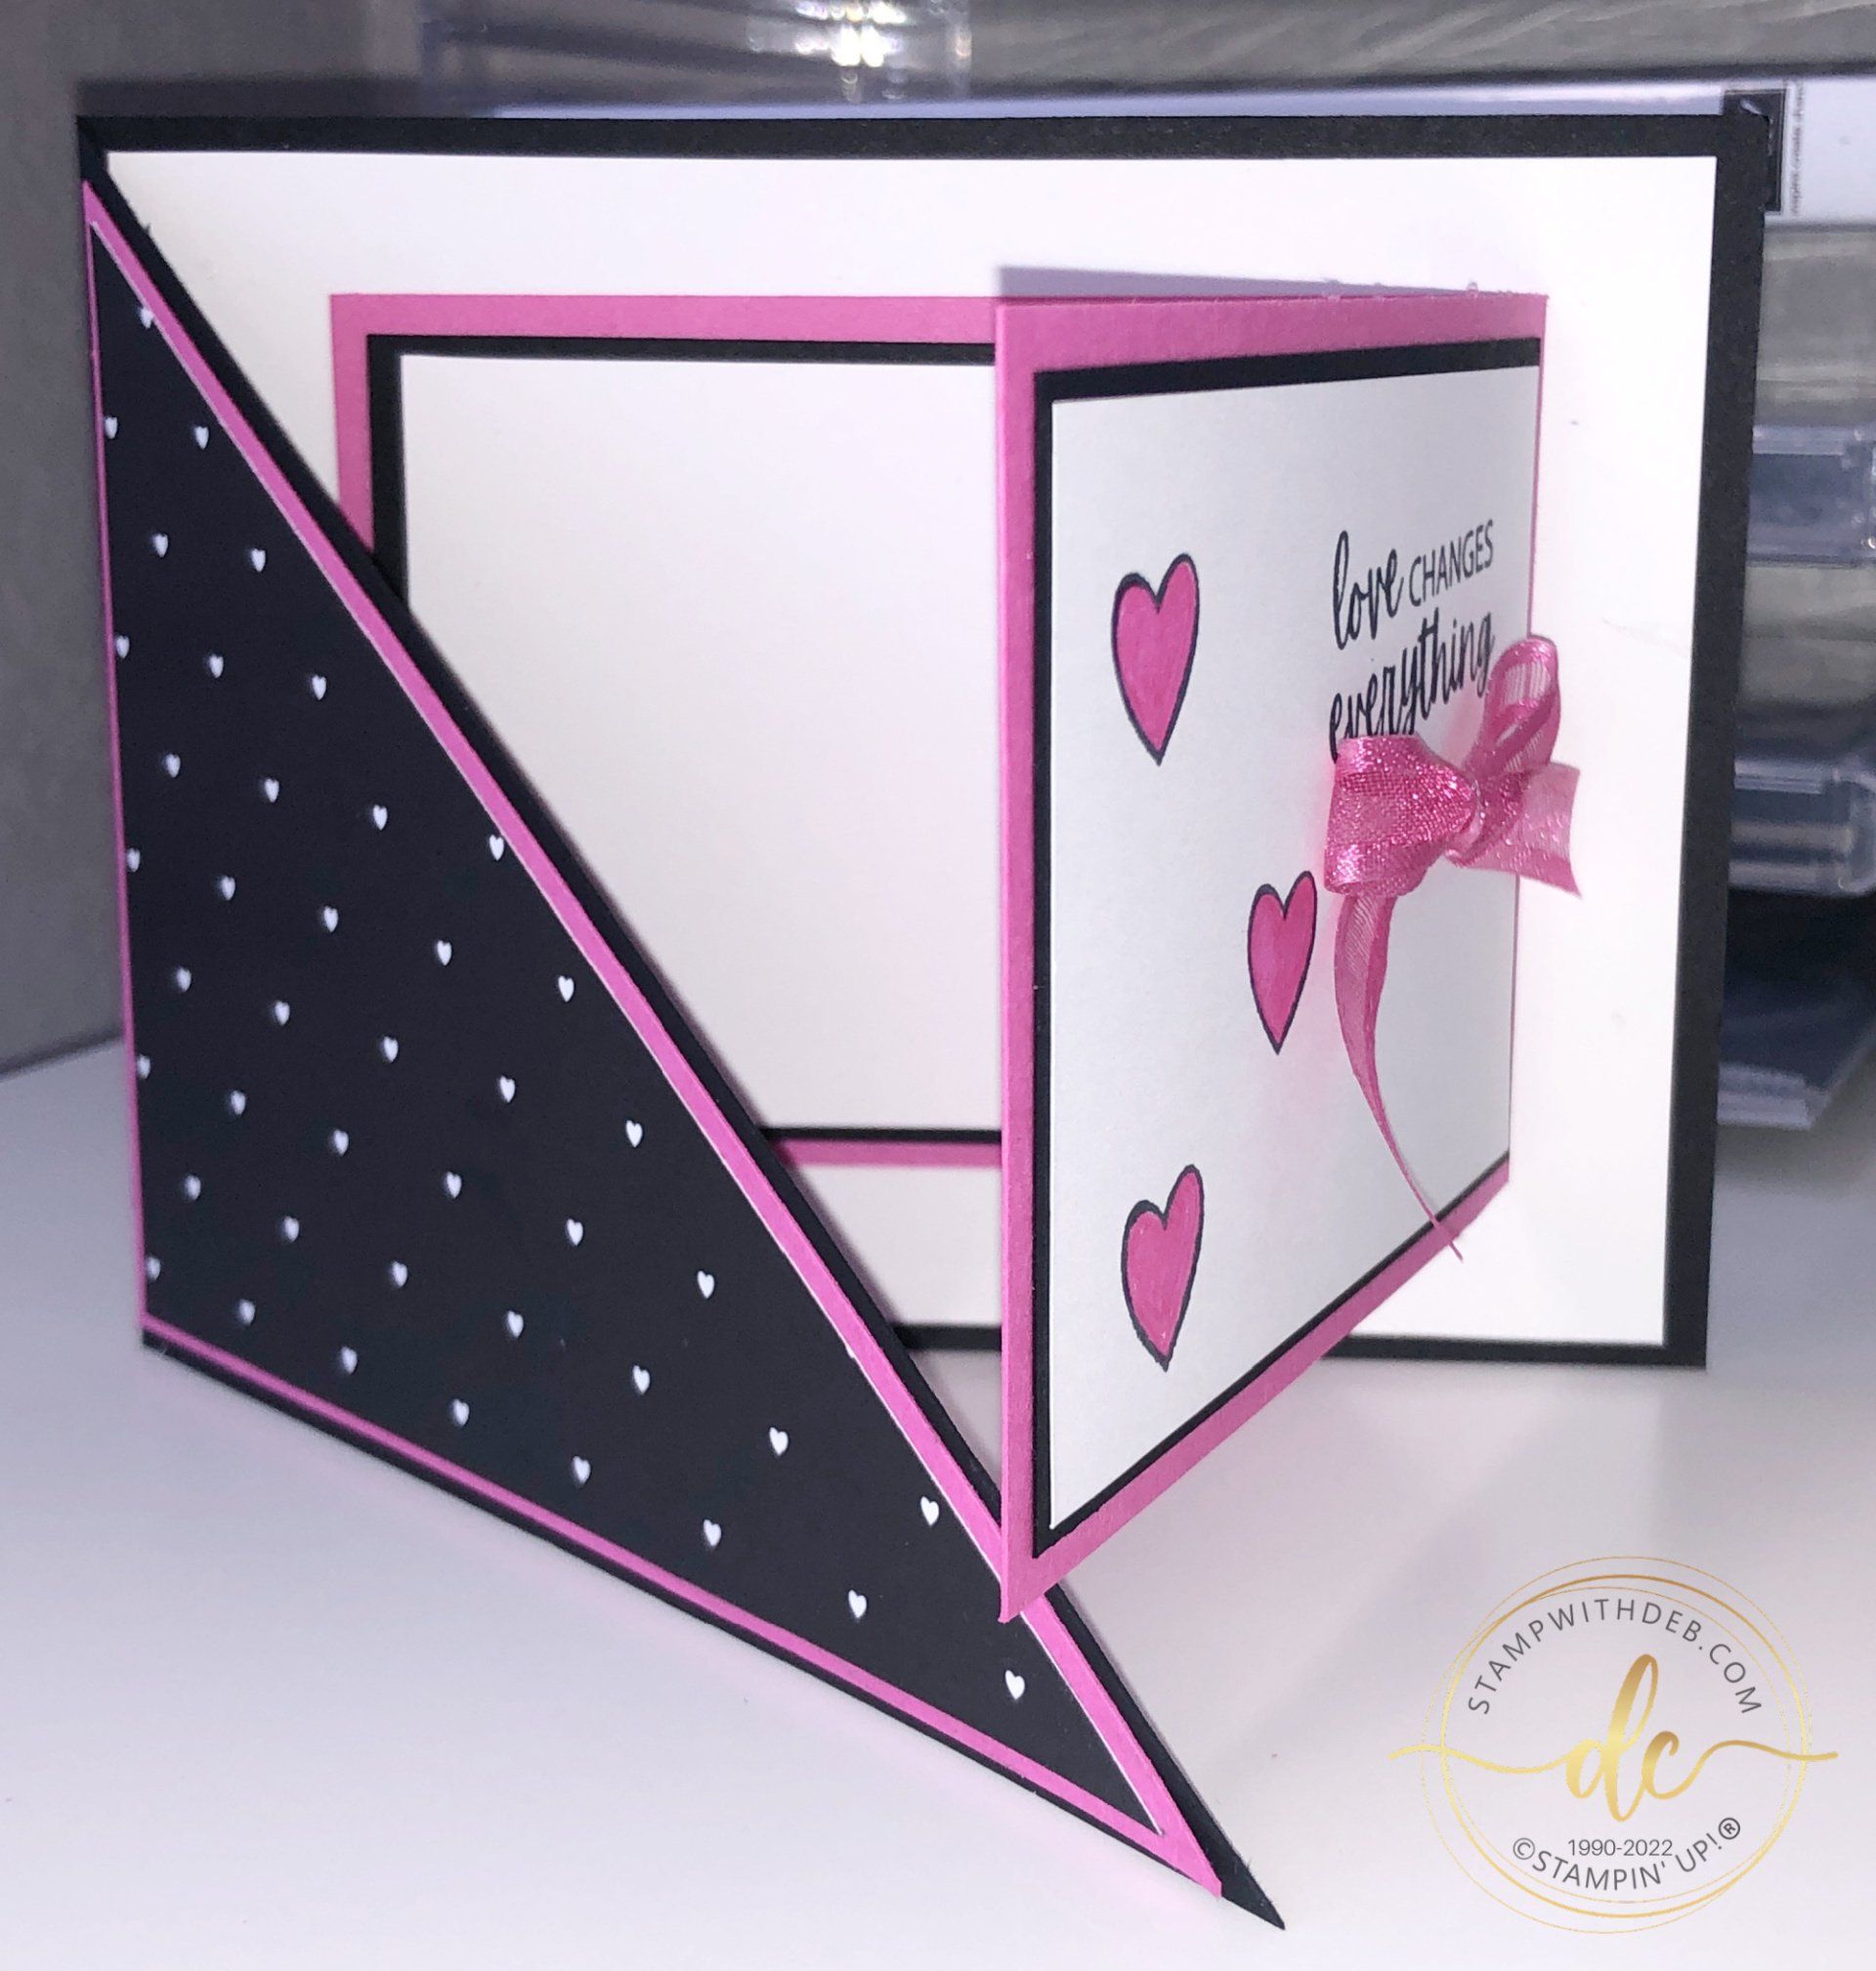
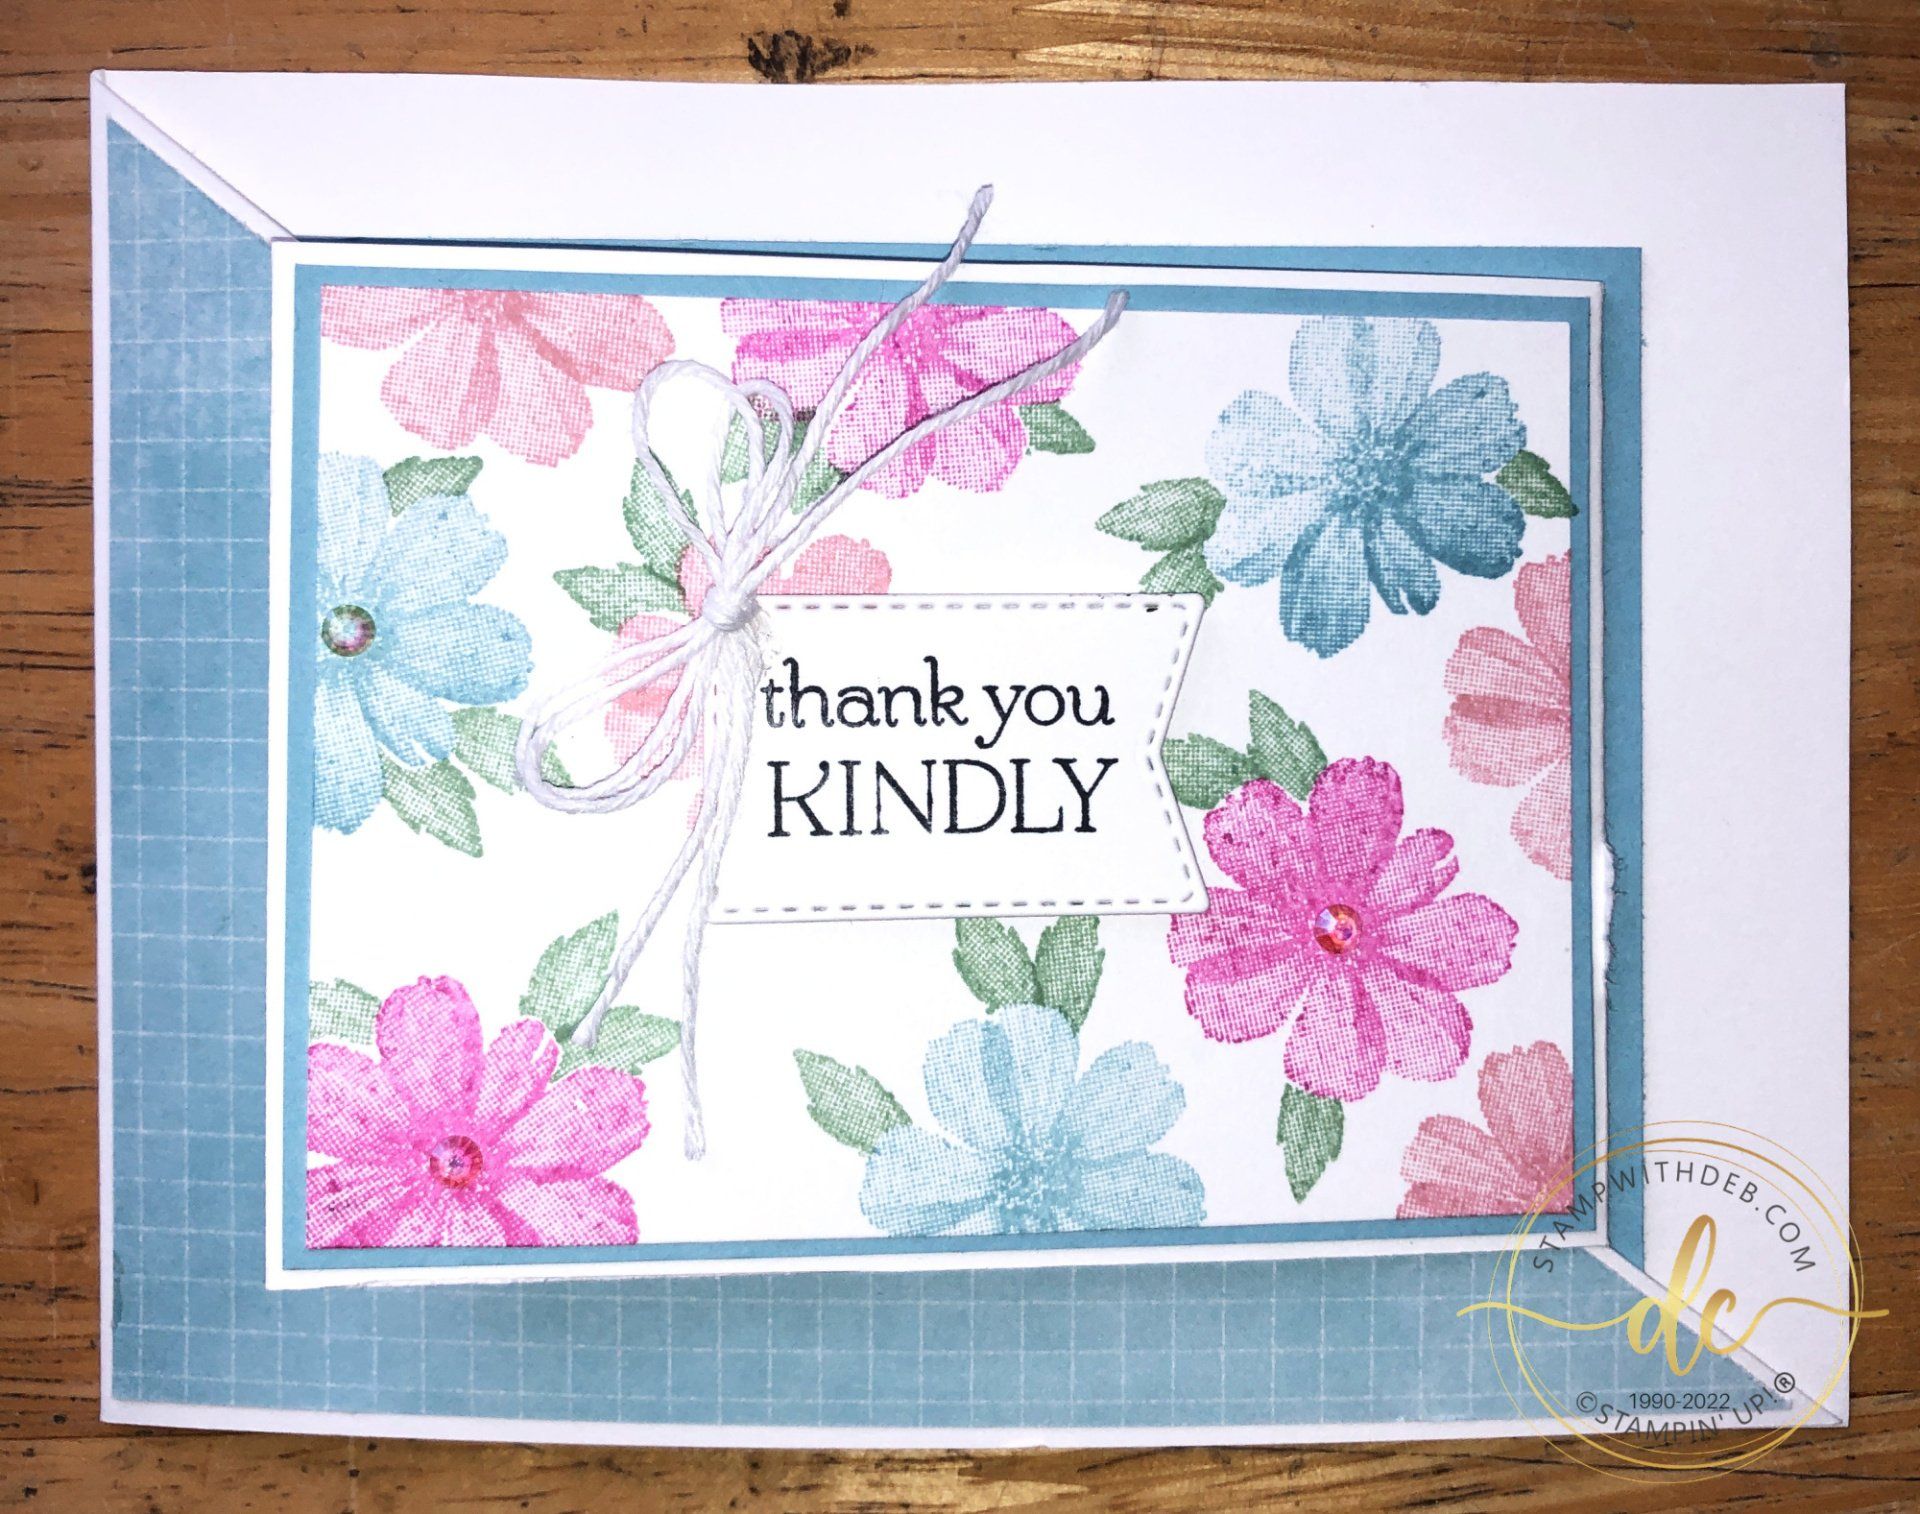
Here is a peek at the inside of the card

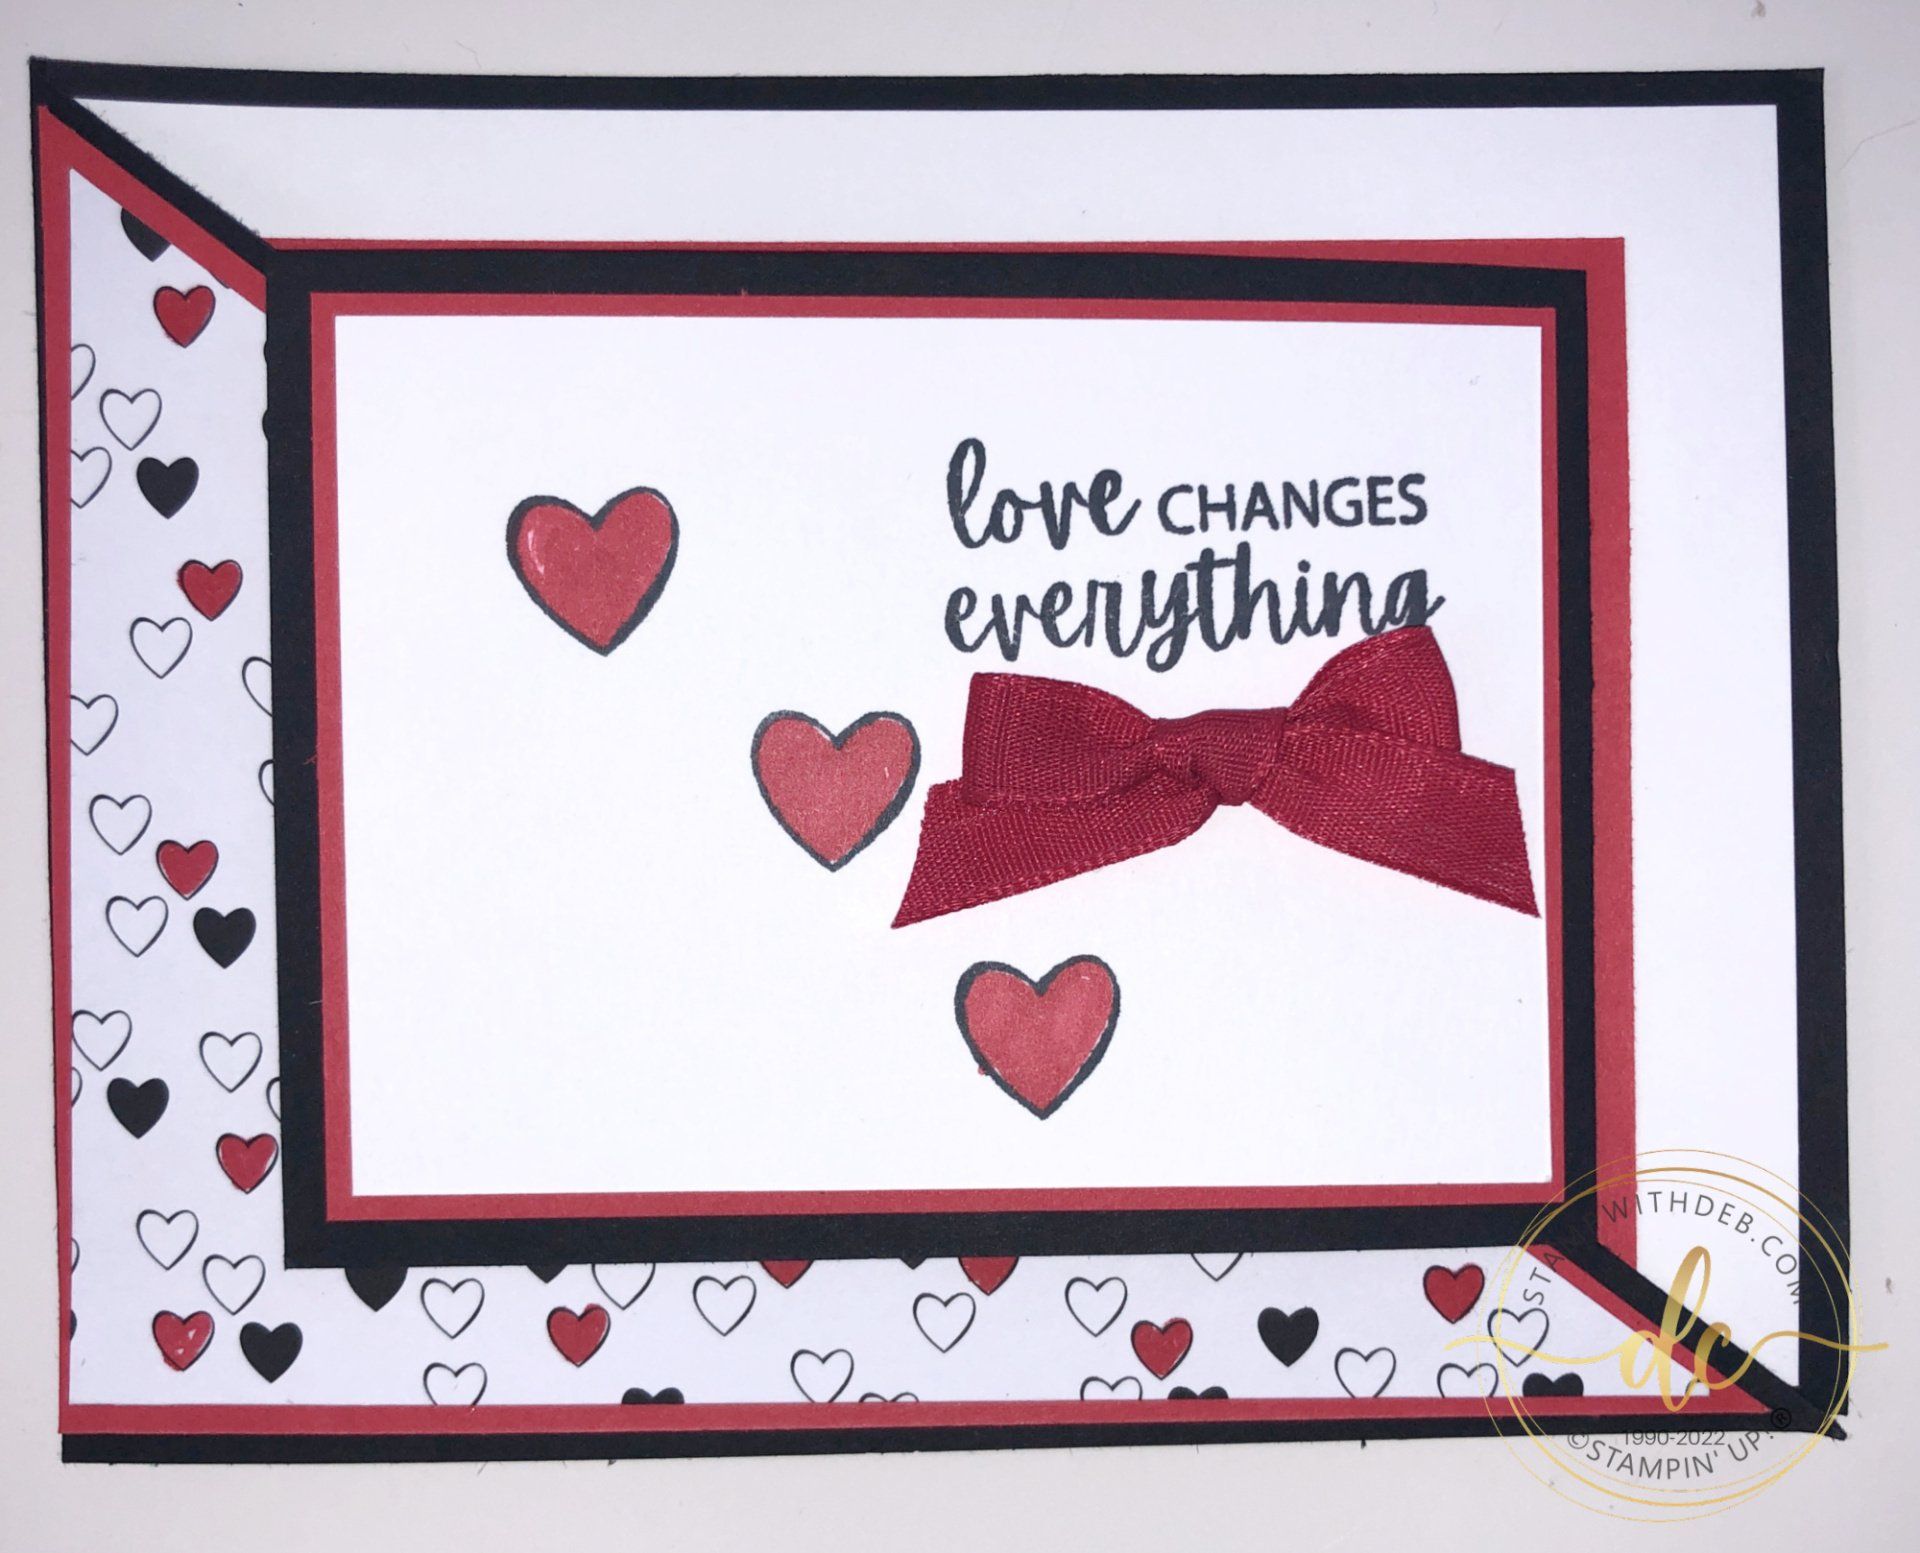
Just changing the color from Magenta to Poppy Parade creates a different look. I also used a different sheet of DSP from the All Together pack

Here is the inside. On this one I added a layer of Poppy Parade to the Joy Card on the inside

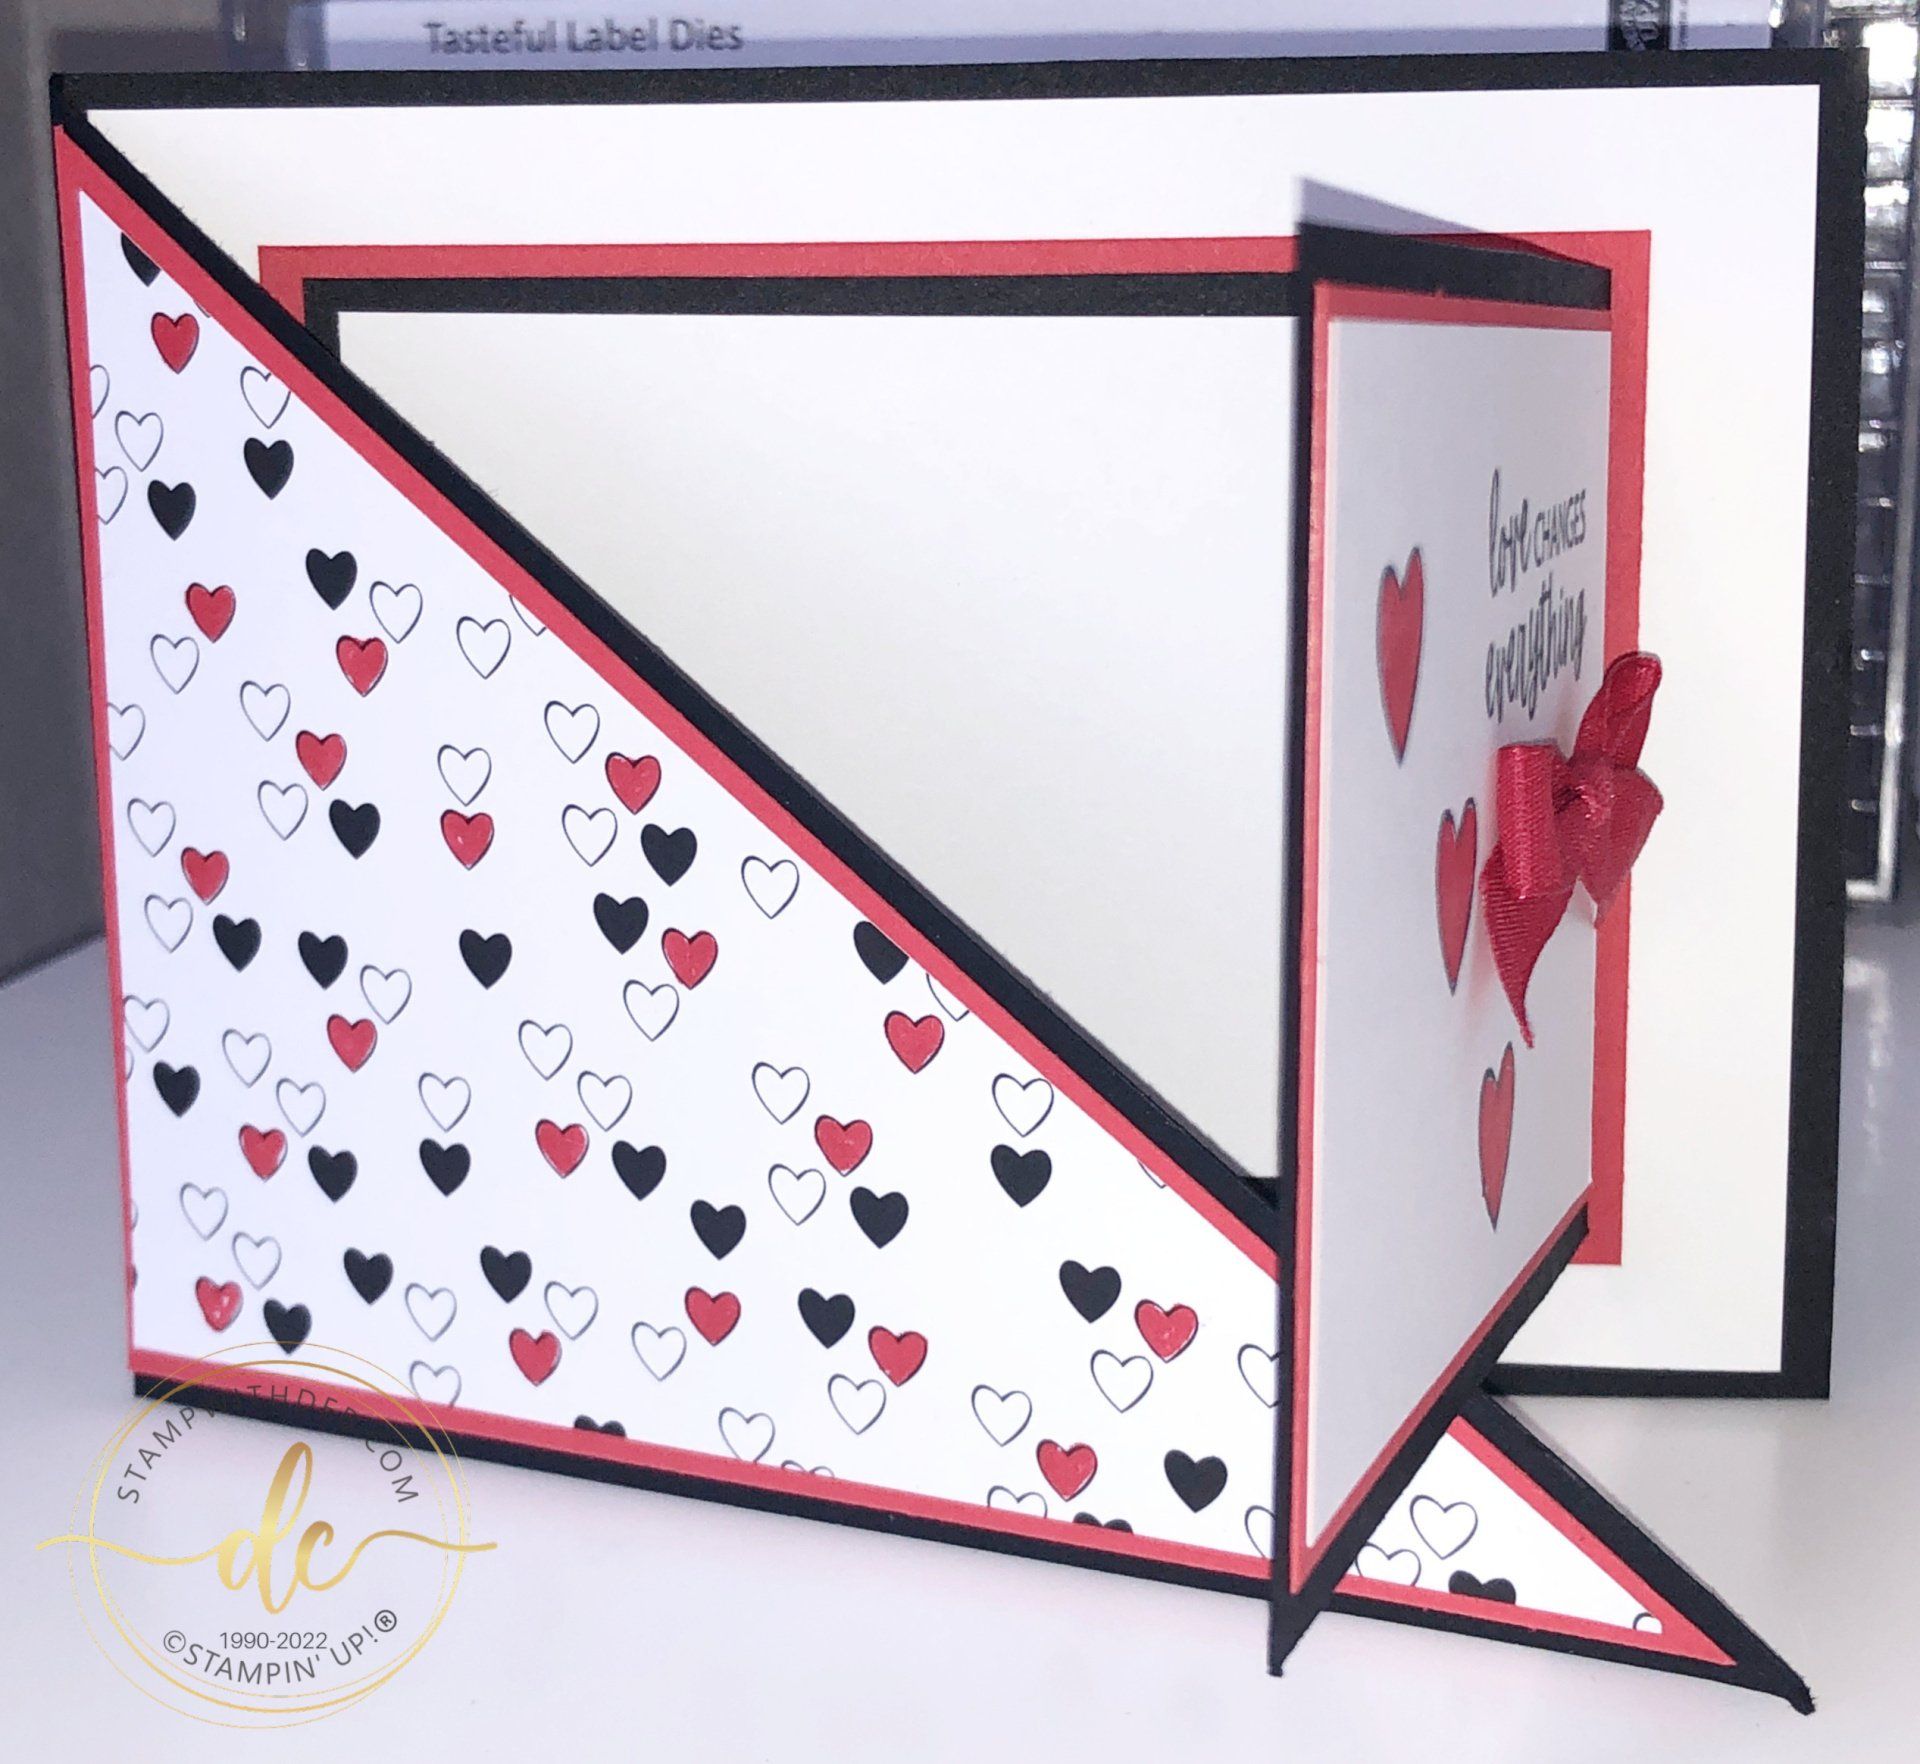
My initial card was created with the Delightful Dahlia. This one uses Balmy Blue, Magenta Madness, Blushing Bride and Mint Macaron. The Designer Series paper came from the Abstract Beauty Designer Series Paper pack

Need a little help figuring this all out? Here is a video for you


Below are the supplies I used to create the Magenta Madness card.


Supplies:

Are you about to hit that $99 mark on your order (before shipping and tax)? If so, why not consider joining my team? As a member, you’ll enjoy $125 worth of products of your choice for only $99! Plus, you’ll snag a fantastic 20% discount on all your future purchases and a variety of exclusive perks from me and Stampin' Up! Dive into this exciting journey of paper crafting with us! For more information, check out my Join My Team page


We now have 3 catalogs each year, January - April, May - August, September - December.  We no longer have an annual catalog.  You will find all of the products in the catalogs online as well as Last Chance and Online Exclusive Products. If you want to check out the May - August Catalog click on that catalog below. If you want a paper copy, please contact me to get yours!

Check out:

Online Exclusives
May - August Catalog Contact me to get yours!

Subscribe to my My YouTube paper crafting video channel
Follow me on 
Pinterest

Follow me on Facebook every week for Stampin' Tell Tuesday
Shop my 
Online Store


916-420-0562

Email Me

By Debbie Chronister June 3, 2026
This adorable Double Z Fold card features the charming Safari Smiles Bundle and is full of fun details and dimension. To create the ground scene, I incorporated the tree image from the Twisted In Time Bundle, adding the perfect touch of whimsy to the design. The soft cloudy sky was created using a homemade cloud template made from a retired Cloud Punch and lightly blended with Cloud Cover ink using a Blending Brush. The sweet elephants were colored with the Light Smokey Slate Stampin' Blend, giving them a soft and realistic appearance. Cloud Cover cardstock was the perfect choice for the card base, tying all the elements together beautifully. Be sure to download the FREE Project Sheet below for complete measurements, supplies, and step-by-step instructions to create this fun fold card yourself!
By Debbie Chronister May 31, 2026
It's time to start the 2027 Calendar! The first six months are ready! This is the first of a two part class, just to ease the stress of doing multiple calendars. This fee covers both classes. The second session will be October 1. If you live locally you can attend one of the classes I offer. One is in Lincoln, CA the other at my Studio in Citrus Heights. Please clear your calendar so you will have enough time to complete the pages. If you will be here during lunch please plan accordingly and bring a light lunch. If you do not live locally, you can purchase a kit to create the calendar. Please add shipping to your registration and if the amount is different, I will invoice to cover the difference.
By Debbie Chronister May 27, 2026
I created this fun and interactive Z Double fold card using the beautiful Balloon Festoon Bundle paired with soft Pool Party cardstock and the lovely Beautiful Ordinary Life Designer Series Paper for a fresh and cheerful look. The Z fold design adds movement and dimension, making the card extra special when displayed. I loved combining the festive balloon images with the soft patterns from the designer paper to create a playful celebration theme with lots of layered detail. The Pool Party color palette gave the project a light, airy feel while allowing the balloons, patterned paper, and embellishments to really stand out. This card was such a fun way to showcase both the unique fold and the versatility of the bundle and designer series paper together. The entire PDF Instructions for 18 alternate cards using the Pretty Party kit is available for purchase in my store along with other Tutorials & Kits.
By Debbie Chronister May 27, 2026
I had so much fun creating this cheerful card using the newly released Stampin' Up! Pretty Party Kit from May along with the beautiful Balloon Festoon Bundle . The soft colors and playful patterns from the kit paired perfectly with the festive balloon images and dies, making this card feel bright and full of celebration. I layered the elements to add dimension and finished it off with a few special embellishments for extra sparkle and texture. This combination made it easy to create a fun, happy card that would be perfect for birthdays, celebrations, or simply sending a little joy to someone special.  This kit is beautiful as it is but if you like a challenge and to do different things with the kits, you can purchase the tutorial for all 18 alternate cards on in my store.
By Debbie Chronister May 13, 2026
This elegant pop up Z fold card combines the timeless beauty of Basic White with soft layers of Crisp Cantaloupe for a fresh and inviting design. Many of our favorite card layouts begin with some form of a Z fold, and this fun interactive style is always a showstopper. I used the beautiful Fragrant Layers Bundle from Stampin' Up! along with the gorgeous Bloom Boutique Designer Series Paper to create soft floral layers and elegant detail throughout the card. The flowers were accented with the sparkling 2026–2028 In Color Dots for the centers, while the adorable 2026–2028 In Color Butterflies add the perfect finishing touch. A delicate bow tied with Crisp Cantaloupe Bordered Ribbon completes this charming project with just the right amount of texture and sweetness.
By Debbie Chronister May 6, 2026
I created this card using one of the more challenging patterns from the Valley In Bloom Designer Series Paper, and I love how it pushed me to think a little more creatively with my design. The detailed background really makes a statement, so I paired it with a simple, elegant greeting from the Scalloped Blooms stamp set to keep the focus balanced. To add a bit of texture and shine, I included Dew Drops embellishments, which catch the light beautifully. The finishing touch is a Mossy Meadow and gold bow, bringing in a rich, coordinated look that ties everything together perfectly while adding just the right amount of sophistication.
Show More