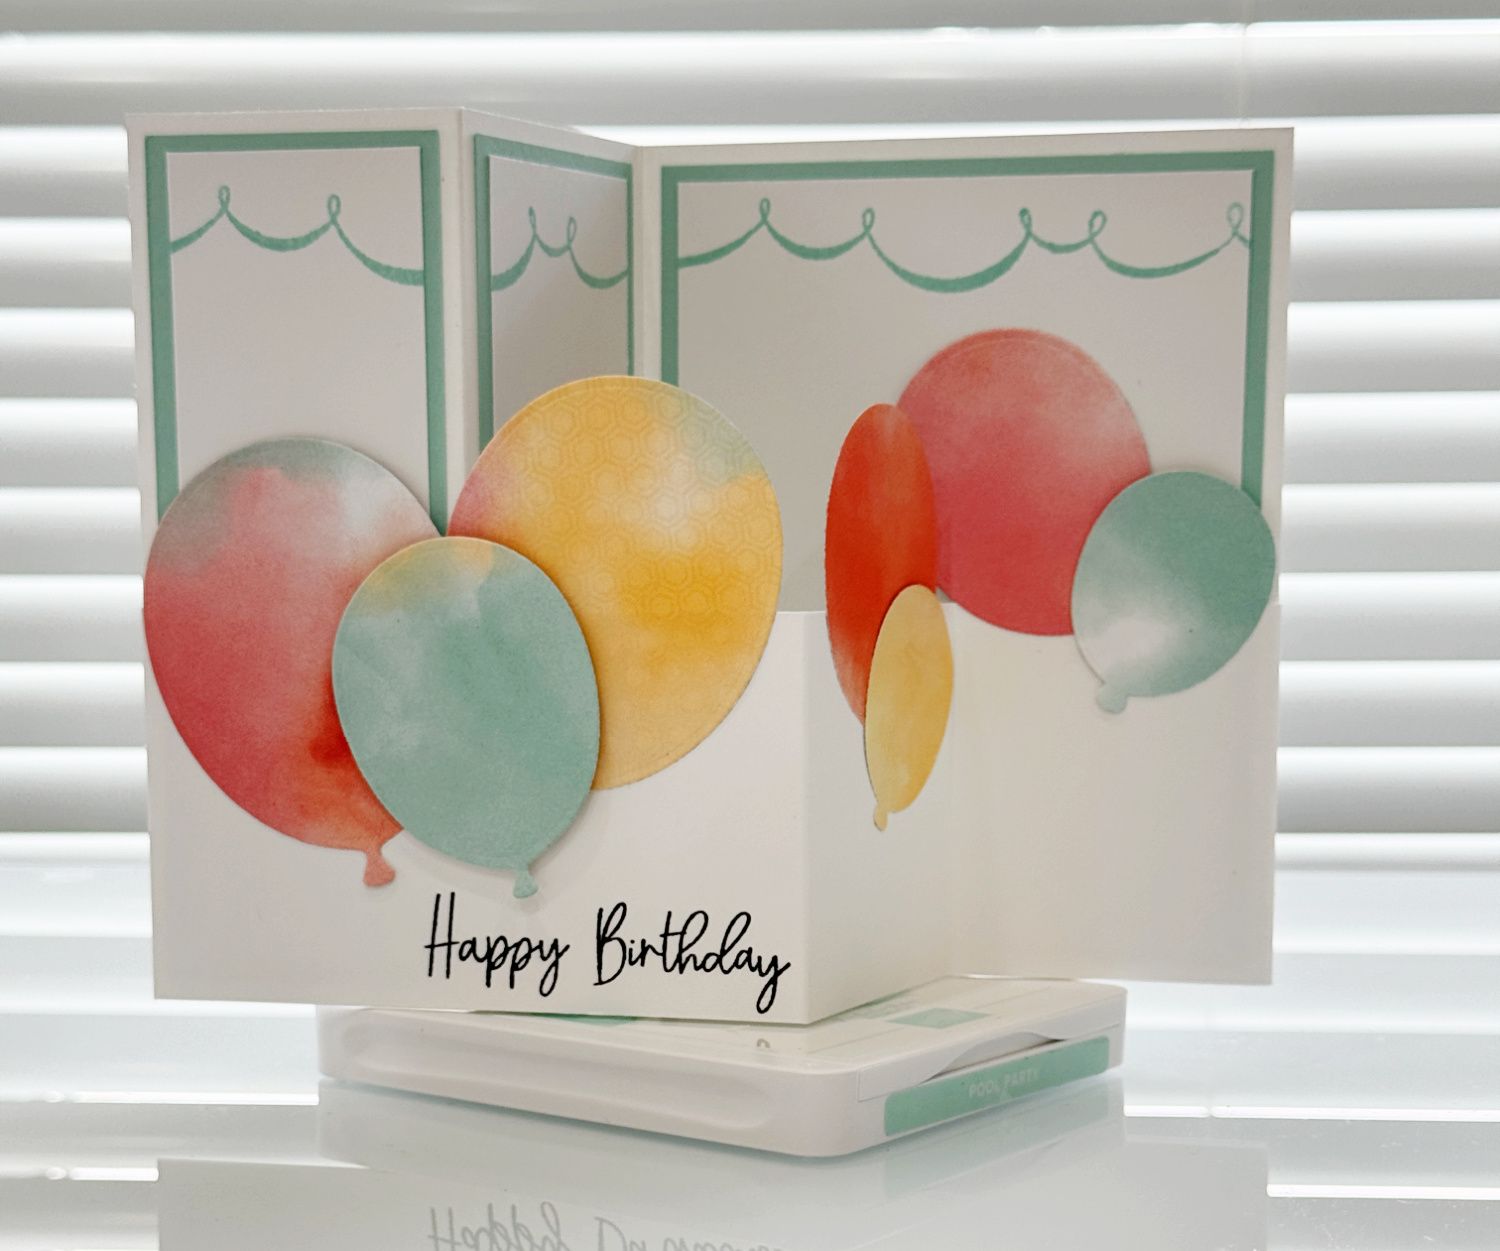
HEY GIRLFRIEND POP UP

January 9, 2021

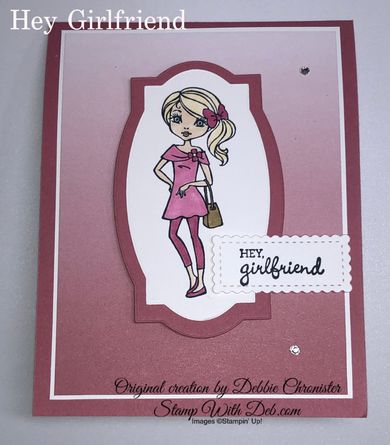
When I first saw this stamp set I knew I had to have it. My son said it was a kick back from Barbie, but I just love the set. I have made so many wonderful "Girl Friends" since I started Stampin' Up and so this one just touched my heart. It also reminded me of how much I have missed being with my "Girl Friends".

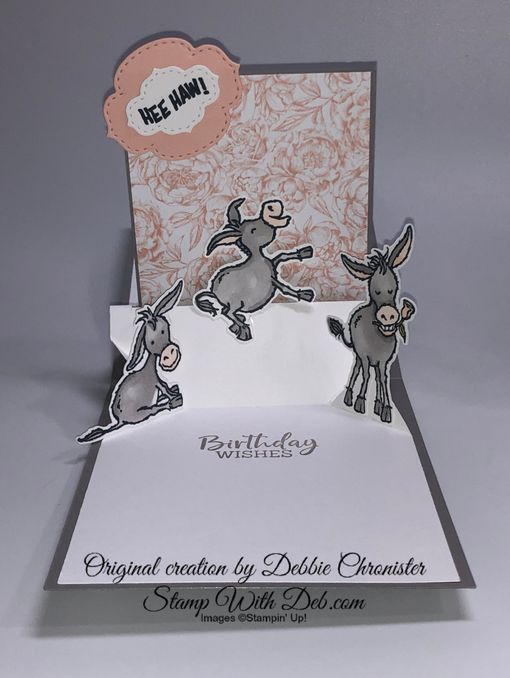
 Then I made this cute card using Darling Donkeys and the Pop Up mechanism and I knew I had to try it with the Hey Girlfriends!

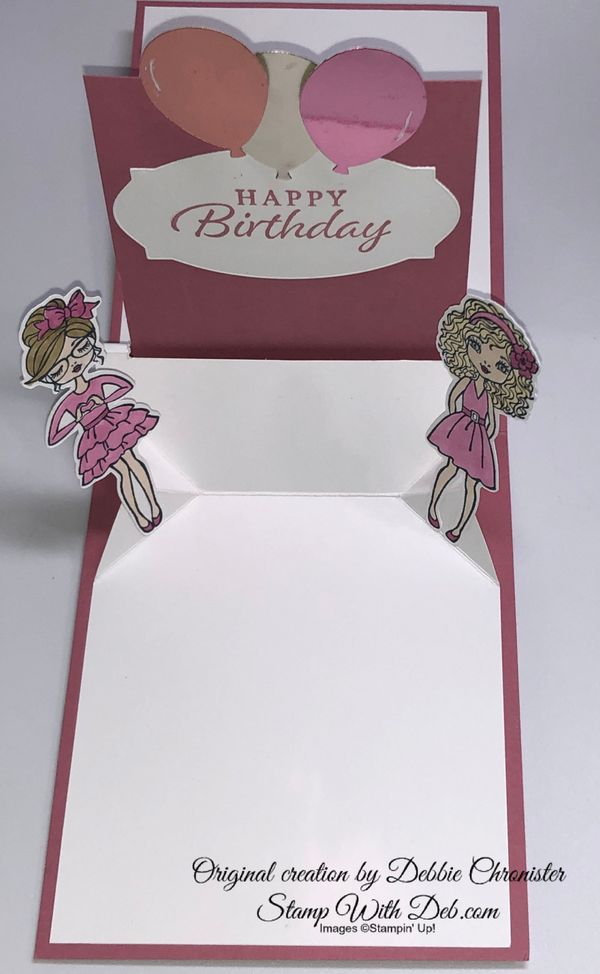
I was afraid that the girls would crash into each other. That didn't seem to be a problem at all. I think you could put flowers instead of the girls or even a bouquet of flowers in the middle between them. To me this card leaves itself open to a multitude of stamps and ideas

INSIDE:
Cut 11 x 4 1/4 Rococo Rose, score @ 5 1/2
Cut 12 x 4 Whisper White, score @ 4 1/2, 6 & 7 1/2, burnish the score lines. At the 4 1/2" line mark on each edge 1" above and below the score line on each side. Mark 1" in on the same score line on each side (put a mark at 1" & 3"). Using a silicone mat and scoring tool draw score lines from the mark on the fold line diagonally to the lines on the side. (Check out the video below if this is not clear). Fold the little score lines so that they pop up

Fold the Whisper White card in half and trim with the Paper Trimmer to create an opening in the top. Leave about 3/8" on each side, snip this piece out with Paper Snips

Cut 5 x 3 1/4 Rococo Rose, with 5" side at the top score @ 1/2 inch, glue the score line to the score line on the Rococo Rose card base. It will come up through the hole

Glue the Whisper White inside to the Rococo Rose on each end. Do not glue the center mountain fold down

Cut the greeting shape from Hippo & Friends Dies in Whisper White and stamp the greeting from Happy Thoughts in Rococo Rose, glue to the Rococo Rose pop up

Stamp the girls 2 of the girls from Girlfriends in Tuxedo Black Momento, color with Rococo Rose, Soft Suede light, So Saffron Light & Ivory, fussy cut around the images, glue their feet to the inside of the card

Punch 1 balloon from each color of foil in the Love You Always Foil Sheets, glue the Sahara Sand balloon to the top and add the Rococo Rose & Blushing Bride with dimensionals


FRONT:

cut 5 1/8 x 3 7/8 Whisper White, adhere to the card front

Cut 5 x 3 3/4 Oh So Ombre Designer Series Paper (THIS IS FREE WITH A $50 ORDER DURING SALE-A-BRATION)

Die cut Rococo Rose using the largest Hippo & Friends shape

Die cut Whisper White using the 2nd largest Hippo & Friends shape, stamp the girl in Tuxedo Black Momento & color
Adhere shapes together and attach with Dimensionals to the card front

Die cut smallest Stitched So Sweetly Die and stamp the greeting in Tuxedo Black Momento. Adhere on the left with glue and on the right with a Dimensional.

Finish off the card with Basic Rhinestones


Check out the NEW 2020-21 ANNUAL CATALOG

January - June 2021 Mini is fabulous!

Sale-A-Bration is HERE! Don’t miss the deals!
Subscribe to my
My YouTube paper crafting video channel
Follow me on
Pinterest

Follow me on Facebook
Shop my
Online Store with January's Host Code 3SBCQAXZ

<

Are you about to hit that $99 mark on your order (before shipping and tax)? If so, why not consider joining my team? As a member, you’ll enjoy $125 worth of products of your choice for only $99! Plus, you’ll snag a fantastic 20% discount on all your future purchases and a variety of exclusive perks from me and Stampin' Up! Dive into this exciting journey of paper crafting with us! For more information, check out my Join My Team page


We now have 3 catalogs each year, January - April, May - August, September - December.  We no longer have an annual catalog.  You will find all of the products in the catalogs online as well as Last Chance and Online Exclusive Products. If you want to check out the May - August Catalog click on that catalog below. If you want a paper copy, please contact me to get yours!

Check out:

Online Exclusives
May - August Catalog Contact me to get yours!

Subscribe to my My YouTube paper crafting video channel
Follow me on 
Pinterest

Follow me on Facebook every week for Stampin' Tell Tuesday
Shop my 
Online Store


916-420-0562

Email Me

By Debbie Chronister June 19, 2026
After a recent event I have 4 of these kits left. They include everything you will need to create these 5 amazing cards made with Nature Walk Designer Series Paper. The kits include the card bases, cut & scored, the designer series paper needed for the kit, all leaves have been cut. This kit includes PDF Instructions. To purchase this kit or others check out my store.
By Debbie Chronister June 17, 2026
This elegant fun fold card showcases the beautiful Framed Violets Bundle paired with the gorgeous 2026–2028 In Color Painted Patterns Designer Series Paper . The soft striped pattern provides the perfect backdrop for the delicate violet image, which was colored using Peaceful Pine and accented with a touch of shimmer from the Barley Blush Shimmer Brush for a subtle, luminous finish. The layered focal panel adds dimension and interest, while the sweet 2026–2028 In Color Butterflies bring a whimsical touch as they flutter around the floral image. A soft Barley Blush Ribbon bow completes the design, adding texture and elegance. This fun fold card is a wonderful way to showcase these beautiful new In Colors while creating a card that is sure to delight the recipient.
By Debbie Chronister June 3, 2026
This adorable Double Z Fold card features the charming Safari Smiles Bundle and is full of fun details and dimension. To create the ground scene, I incorporated the tree image from the Twisted In Time Bundle, adding the perfect touch of whimsy to the design. The soft cloudy sky was created using a homemade cloud template made from a retired Cloud Punch and lightly blended with Cloud Cover ink using a Blending Brush. The sweet elephants were colored with the Light Smokey Slate Stampin' Blend, giving them a soft and realistic appearance. Cloud Cover cardstock was the perfect choice for the card base, tying all the elements together beautifully. Be sure to download the FREE Project Sheet below for complete measurements, supplies, and step-by-step instructions to create this fun fold card yourself!
By Debbie Chronister May 31, 2026
It's time to start the 2027 Calendar! The first six months are ready! This is the first of a two part class, just to ease the stress of doing multiple calendars. This fee covers both classes. The second session will be October 1. If you live locally you can attend one of the classes I offer. One is in Lincoln, CA the other at my Studio in Citrus Heights. Please clear your calendar so you will have enough time to complete the pages. If you will be here during lunch please plan accordingly and bring a light lunch. If you do not live locally, you can purchase a kit to create the calendar. Please add shipping to your registration and if the amount is different, I will invoice to cover the difference.
By Debbie Chronister May 27, 2026
I created this fun and interactive Z Double fold card using the beautiful Balloon Festoon Bundle paired with soft Pool Party cardstock and the lovely Beautiful Ordinary Life Designer Series Paper for a fresh and cheerful look. The Z fold design adds movement and dimension, making the card extra special when displayed. I loved combining the festive balloon images with the soft patterns from the designer paper to create a playful celebration theme with lots of layered detail. The Pool Party color palette gave the project a light, airy feel while allowing the balloons, patterned paper, and embellishments to really stand out. This card was such a fun way to showcase both the unique fold and the versatility of the bundle and designer series paper together. The entire PDF Instructions for 18 alternate cards using the Pretty Party kit is available for purchase in my store along with other Tutorials & Kits.
By Debbie Chronister May 27, 2026
I had so much fun creating this cheerful card using the newly released Stampin' Up! Pretty Party Kit from May along with the beautiful Balloon Festoon Bundle . The soft colors and playful patterns from the kit paired perfectly with the festive balloon images and dies, making this card feel bright and full of celebration. I layered the elements to add dimension and finished it off with a few special embellishments for extra sparkle and texture. This combination made it easy to create a fun, happy card that would be perfect for birthdays, celebrations, or simply sending a little joy to someone special.  This kit is beautiful as it is but if you like a challenge and to do different things with the kits, you can purchase the tutorial for all 18 alternate cards on in my store.
Show More