SPRING SHADOW BOX INSTRUCTIONS
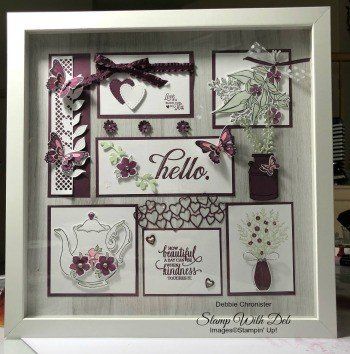
This sweet shadow box brings together the old and new. Some of the items like the milk can come from the Holiday Catalog and then things like the hearts and tea pots come from the new Occasions Catalog. I was challenged by my club members to create a spring shadow box and this is what I came up with.
These instructions start at the top left and move from left to right in rows. You will be able to identify the square by the name. Below are the products you will need to make this frame. I did not realize I had used so many different stamp sets and dies. Next time I will work on using only a couple. This would make a great class if you are a demonstrator and have purchased these sets.
STAMPS & DIES
Wonderful
Romance Bundle #150592
Butterfly
Gala Bundle #150599
Be Mine Stitched
Framelits #148527
Tea Together
Stamp Set #148779
Tea Time
Framelits #149697 (Free Sale-A-Bration item)
Life Is
Grand Stamp Set #148744
Stitched
Seasons Dies #149013
Country Home
#147678
Butterfly
Beauty Thinlits #148536
Enjoy Life
#148190
Wishing You
Well #147864
Varied Vases
#146644
INKS:
Tuxedo Black
Momento
Soft Seafoam
Combo Stampin’ Blend
Flirty
Flamingo Light Stampin’ Blend
Blackberry
Bliss Light Stampin’ Blend
Fresh Fig
Stampin’ Pad
Soft Seafoam
Stampin’ Pad
ACCESSORIES:
Big Shot, Rhinestones, Fresh Fig 3/8” Mini Ruffled Ribbon, 5/8” Polka Dot Tulle Ribbon, 1/8” Sheer Fresh Fig Ribbon, Frosted & Clear Epoxy Droplets (147801) Holiday Catalog, Corrugated Dynamic Textured Impressions Embossing Folder, Epoxy Heart Droplets, Vase Builder Punch, Silver & White Baker’s Twine

#1 Butterfly Lattice
Whisper
White – 5 ¾ x 2, 7 x 2 ¾
Fresh Fig –
6 x 1 3/4
- Die cut the lattice using the Wonderful Floral
Framelits in the smaller of the Whisper White pieces
- Stamp three butterflies with Tuxedo Black
Momento on the 7 x 2 ¾ Whisper White. Color the Butterflies with Blackberry
Bliss Light Stampin’ Blend & Flirty Flamingo Light Stampin’ Blend
- Punch with the Butterfly Duet Punch
- Layer the small butterfly in the center of the
large butterfly, rolling your glue dot and placing it on the back of the
smaller butterfly. Attach two of the butterflies to this piece, save the other
for later
- Finish off with two rhinestones on each butterfly
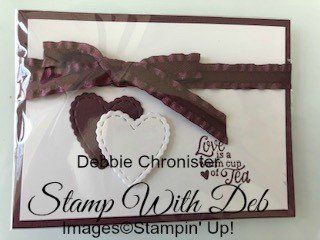
#2 Hearts and Ribbon
Whisper
White – 3 ¾ x 2 ¾, scraps for hearts
Fresh Fig –
4 x 3, scraps for hearts
- Stamp greeting from Tea Together in Fresh Fig on
the bottom right
- Adhere the Whisper White to the Fresh Fig and
wrap the ribbon around adhering it on the back
- Tie a bow and attach it with a glue dot
- Die cut the two hearts one from Fresh Fig scrap
and one from Whisper White using the smallest heart from Be Mine Stitched
Framelits
- Glue the Fresh Fig heart to the paper
- Use a
Dimensional to attach the Whisper White heart offset from the Fresh Fig heart

#3 Sprig of Flowers
Whisper White – 3 x 3, 4 x 4
Fresh Fig – 3 ¼ x 3 1/4
- Stamp the sprig of flowers from the Wonderful Romance Bundle in Tuxedo Black Momento on the 4 x 4 Whisper White
- Color the flowers with Blackberry Bliss Light Stampin’ Blend
- Color the leaves with the Soft Seafoam Combo pack
- Fold the Polka Dot Tulle in half and tie a knot in the middle with the 1/8” Sheer Fresh Fig Ribbon
- Attach the sprig to the Whisper White using dimensionals
- Finish off with a Frosted & Clear Epoxy Droplets in the center of each flower

#4 Hello
Whisper White – 5 ½ x 2 ¼
Fresh Fig – 5 ¾ x 2 ½
Soft Seafoam – 4 x 1 ½
- Cut the branch from the Soft Seafoam using Stitched Seasons Dies
- Attach the branch with a dimensional
- Stamp the Hello from Life Is Grand in Fresh Fig
- Here is where the third Butterfly that you made in #1 comes into play
- Attach the flower (which will come later) to the branch
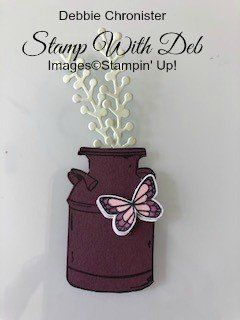
#5 Milk Can
Whisper White – 1 x 3
Fresh Fig – 1 ½ x 2 ½
Soft Seafoam – 3 x 2
- Cut two of the flower stems dies from the Butterfly Beauty Thinlits from the Soft Seafoam
- Stamp the milk can in Tuxedo Black Momento on the Fresh Fig and fussy cut
- Stamp two Butterflies from Butterfly Gala, you only need the small one for this, on the Whisper White
- Color the Butterflies with Blackberry Bliss Light and Flirty Flamingo Light Stampin’ Blend
- Layer the Butterflies and finish off with one Rhinestone
- Attach the two flower stems to the back of the milk can
- Attach Milk Can directly to the background

#6 Teapot
Whisper White – 3 ¾ x 3 ¾, 4 x 4, 2 x 3
Fresh Fig – 4 x 4
- Stamp the Teapot with Tuxedo Black Momento on the 4 x 4 Whisper White
- Stamp one flower on the Teapot with Tuxedo Black Momento. Color with Soft Seafoam Dark and Flirty Flamingo Light Stampin’ Blends
- Stamp two flowers on the 2 x 3. Color them with Soft Seafoam Dark and Blackberry Bliss Light Stampin’ Blends
- Color the teapot with the Stampin’ Blends to give it a little character
- Cut with the Teapot from Tea Time Framelits
- Emboss the 3 ¾ x 3 ¾ Whisper White with the Corrugated Dynamic Textured Impressions Embossing Folder
- Attach the two flowers that were fussy cut to the teapot with Dimensionals
- Attach the teapot to the background with Dimensionals
- Finish with the Frosted Epoxy Droplets

#7 How Beautiful
Whisper White – 2 x 3
Fresh Fig – 2 ¼ x 3 ¼, 2 x 4 ¼
- Stamp the greeting from Enjoy Life in Fresh Fig on the 2 x 3 Whisper White
- Cut the hearts from Be Mine Stitched Framelits from the Fresh Fig 2 x 4 ¼. Keep 2 of the hearts to use on the greeting
- Attach an Epoxy Heart Droplet to the two hearts you kept and place one at the top left of the greeting and one at the bottom right
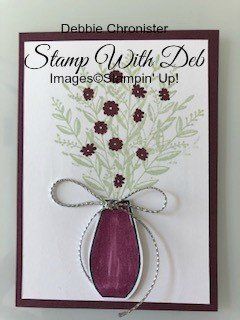
#8 Bouquet
Whisper White – 3 ½ x 2 ½, 2 x 3
Fresh Fig – 2 ¾ x 3 ¾
- Stamp the vase outline from Varied Vases in Tuxedo Black Momento on the 2 x 3 and color
- Punch the vase out using the Vases Builder Punch
- Stamp greenery from Wishing You Well on the Whisper White with Soft Seafoam
- Stamp the flowers from Wishing You Well with Fresh Fig
- Attach the vase with a Dimensional
- Tie a bow using two strands of the Silver & White Baker’s Twine
- Attach the bow to the vase with a glue dot
To finish off punch six little flowers with the Bitty Blooms Punch Pack in Fresh Fig and adhere two together. Scatter them wherever they fit best on the frame.
To be sure my frame is straight I take a piece of the White backing that comes in our Designer Series Paper and cut it so I have one inch on each side. Using the Stampin’ Trimmer I place it at the 1” on the right and cut from 1” to 11”. Then turn it and do the same thing on each side. This will give you a 1” frame all the way around. Use some Mini Binder Clips to hold the edges and place the images around the outer edge against the inner edge of the frame.
If you have any questions please do not hesitate to contact me. Watch for what I did when one of my club members did not want to do the frame but wanted to be a part of the group!!!
Below is a list of the products I used.
Happy Stamping!
Are you about to hit that $99 mark on your order (before shipping and tax)? If so, why not consider joining my team? As a member, you’ll enjoy $125 worth of products of your choice for only $99! Plus, you’ll snag a fantastic 20% discount on all your future purchases and a variety of exclusive perks from me and Stampin' Up! Dive into this exciting journey of paper crafting with us! For more information, check out my Join My Team page
We now have 3 catalogs each year, January - April, May - August, September - December. We no longer have an annual catalog. You will find all of the products in the catalogs online as well as Last Chance and Online Exclusive Products. If you want to check out the May - August Catalog click on that catalog below. If you want a paper copy, please contact me to get yours!
Check out:
Online Exclusives
May - August Catalog - Contact me to get yours!
Subscribe to my My YouTube paper crafting video channel
Follow me on Pinterest
Follow me on Facebook every week for Stampin' Tell Tuesday
Shop my Online Store