Wetlands

April 28, 2017

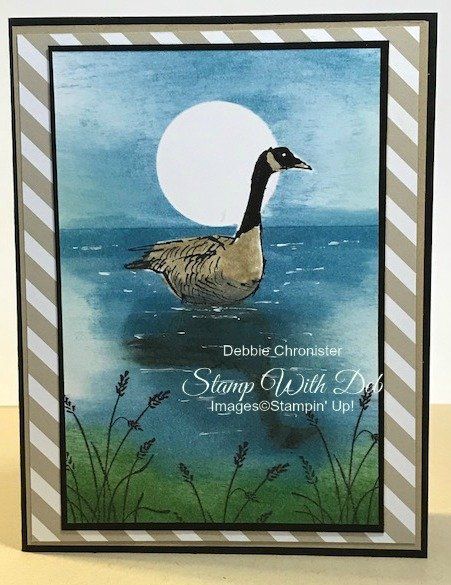
This is one stamp set that I have enjoyed for the greetings. I haven’t done much else with it. Maybe a little plant here or there. One of the gals in my club asked me to teach them how to do a reflection. I used the Beautiful You set with the umbrella and a puddle of water with the reflection in the water. It was okay but I just wasn’t thrilled with it. When I teach a technique I like to do at least two projects using the same technique. So as I looked over my retiring stamp sets, I decided the duck in Wetlands would be a good reflection. I was very pleased with how it came out and the gals in my club did an excellent job on theirs as well.

Basic Black for the card base 8 1/2 x 5 1/2 & 3 3/8 x 5
Crumb Cake 5 3/8 x 4 1/8
Designer Series Paper Pack (Neutrals) 5 1/4 x 4
Whisper White 3 1/4 x 4 7/8″

  • On the Whisper White cardstock, stamp the duck, using Basic Black ink, in the middle of the page. I didn’t want his feet to show so after inking the stamp I put a piece of tape across the grass and feet.
  • Stamp the duck again, this time use the clear plastic sheet that comes in the photopolymer stamp sets, the piece that covers the stamps (not the one with the images) or a Window Sheet. Stamp so his feet and the grass are not on the sheet.
  • Turn it over and place it just below the image you previously stamped. Hold on tight and rub the plastic sheet firmly (you could use a bone folder edge to get a good imprint).
  • Stamp the plants in Basic Black along the bottom of the Whisper White.
  • Stamp the duck image on a “Sticky Note” and cut out the body, don’t worry about the feet, this will serve as a mask to keep you from sponging on the duck image.
  • Punch a 1 1/4″ circle from a “Sticky Note” and adhere that so it looks like it is behind the duck.
  • Cover the duck with the mask you created and start sponging. Start with Soft Sky and do the sky and down the edges. Then with Marina Mist and give it some darkness. To create the horizon put a piece of cardstock just above the duck and below the moon and sponge along the edge with Marina Mist until it is dark.
  • Sponge the bottom of the Whisper White with Garden Green.
  • Color the reflection with Crumb Cake Stampin’ Write Marker and if needed blend it with the Marina Mist sponge.
  • Remove the mask and color the duck with Crumb Cake and his lower chest with Smoky Slate.
  • To give the image the finishing touch I used a white gel pen, a retired product, but one I have loved for many years and found many uses for it. It gives the look that the water is moving. I hope you will enjoy this set as much as I have. Too bad it is retiring it’s been a great set.

Below are the supplies you will need to duplicate this project. Just click on the image and it will take you to my Stampin’ Up! website where you can order. Or you can click on the Shop logo below to place your order.


Are you about to hit that $99 mark on your order (before shipping and tax)? If so, why not consider joining my team? As a member, you’ll enjoy $125 worth of products of your choice for only $99! Plus, you’ll snag a fantastic 20% discount on all your future purchases and a variety of exclusive perks from me and Stampin' Up! Dive into this exciting journey of paper crafting with us! For more information, check out my Join My Team page


Check out the  2024-25 ANNUAL CATALOG

May - April Annual Catalog releases May 6, 2025. Contact me to get yours!

Subscribe to my My YouTube paper crafting video channel
Follow me on 
Pinterest

Follow me on Facebook every week for Stampin' Tell Tuesday
Shop my 
Online Store


916-420-0562

Email Me

By Debbie Chronister May 6, 2026
I created this card using one of the more challenging patterns from the Valley In Bloom Designer Series Paper, and I love how it pushed me to think a little more creatively with my design. The detailed background really makes a statement, so I paired it with a simple, elegant greeting from the Scalloped Blooms stamp set to keep the focus balanced. To add a bit of texture and shine, I included Dew Drops embellishments, which catch the light beautifully. The finishing touch is a Mossy Meadow and gold bow, bringing in a rich, coordinated look that ties everything together perfectly while adding just the right amount of sophistication.
By Debbie Chronister April 22, 2026
This beautiful fun fold card was created using the Waterside Retreat April 2026 Paper Pumpkin kit from Stampin’ Up!, featuring the soft, calming tones of Gray Granite for an elegant and serene look. The unique fold adds an extra touch of interest, allowing the peaceful waterside imagery to shine from every angle while creating a delightful surprise when opened. The layered elements and coordinating designs from the kit make it easy to craft a card that feels both sophisticated and heartfelt, perfect for a variety of occasions. Be sure to check out the Free Project Sheet for step-by-step instructions so you can recreate this lovely design with ease!
By Debbie Chronister April 18, 2026
Create 15 fun, all-occasion cards with the adorable Cute As A Bug Designer Series Paper in a project that’s as relaxing as it is rewarding. This kit makes it easy—everything is pre-cut and ready to go, except for the charming images from the Designer Series Paper that you’ll get to fussy cut yourself. Simply turn on a favorite movie, grab your scissors, and enjoy cutting out the delightful designs that will bring each card to life. Don't like fussy cutting? You will be able to purchase the dies at registration. Ten of the images can be cut with the coordinating dies. All the layers are prepared for you, so assembly is a breeze. Your kit includes a full package of the Cute As A Bug Designer Series Paper (pre-cut for your projects), coordinating bling, and envelopes—plus you’ll have plenty of extra left over to keep the creativity going and make even more of these cheerful cards! This is an online class. You will receive PDF Instructions and videos to guide you through putting the cards together. Kits will be shipped on May 1, PDF & Video links will be sent to you via email on May 1, 2026
By Debbie Chronister April 15, 2026
This cheerful greeting card comes to life with the playful patterns of the Cute As A Bug Designer Series Paper paired beautifully with rich Blackberry Bliss cardstock. Adorable bug images are carefully hand-cut from the paper, adding a whimsical, handmade touch that makes each card feel extra special. A sweet greeting tag ties the design together, while charming ladybug embellishments bring dimension and a pop of personality. Finished with a soft accent of Blackberry Bliss striped ribbon, this card is a delightful combination of fun and elegance—perfect for brightening someone’s day for any occasion.
By Debbie Chronister April 8, 2026
I had so much fun creating this playful fun fold card using the Sweet Bugs Bundle from Stampin’ Up! The interactive design adds an extra element of surprise, making it just as exciting to open as it is to display. I paired it with a greeting from the Lovely Arrangements set, which complements the whimsical bug images perfectly. One of my favorite features of this bundle is how the coordinating dies effortlessly cut out the images from the Designer Series Paper, making it easy to create a polished, layered look with minimal fuss. This card is a great example of how simple tools can come together to create something truly special! Be sure to download the Free Project Sheet below for the correct measurements.
By Debbie Chronister April 3, 2026
Join the vibrant 2026-28 In Color Club with me, and get ready to unleash your creativity! Over the next five months, one color each month, you’ll receive an exciting selection of products, including: 10 sheets of cardstock Two 12 x 12 sheets of Designer Series Paper A new Magnetic Stampin' Pad A two pack of Stampin' Blends Two yards of gorgeous ribbon The fabulous New Shimmer Pen (this is not in photo due to availability at the time of this post) Plus, your first order includes delightful In Color Dots! Each kit comes with supplies, instructions, and videos for crafting your first four cards in each color. This is an amazing deal at $54.95 (include shipping & tax) each month and will give you all the NEW In Colors to experience and decide which one is your favorite. This way you can build up your new In Colors at a fraction of the cost. Don't miss out—registration closes on May 1, 2026, with your first kit shipping on May 15! Let’s create something beautiful together!
Show More