
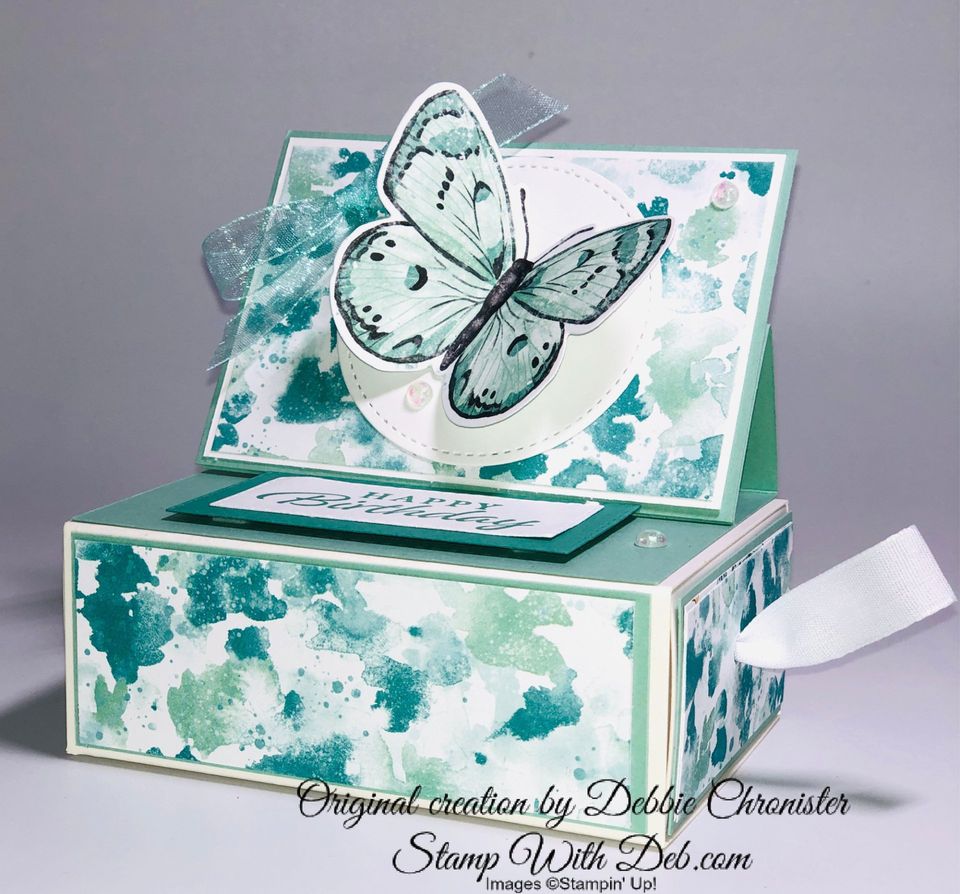
BUTTERFLY BRILLIANCE EASEL CARD BOX
This beautiful bundle of butterflies is amazing! The stamp is huge but it stamps 6 butterflies at once and the coordinating dies cut them all out at once. This set is only available to Demonstrators at this time, however, it will be coming out in the new 2021-22 Annual Catalog. Want a taste of it now? You can order this set NOW if your purchase the starter kit. You will not only be able to purchase this beautiful bundle but you will get 5 packages of the NEW 2021-22 Designer Series Papers. The cost of the Starter Kit is only $99 and you will be able to pick $125 product that YOU want. To find out more about this great deal visit "Join My Team"
INSTRUCTIONS
For the box portion of this project I used the Love You Always Treat Boxes
Sides of the box
Cut (2) 1 3/8 x 3 7/8 Mint Macaron, adhere to the sides of the lid
Cut (2) 1 1/4 x 3 3/4 Basic White, adhere to the Mint Macaron
Cut (2) 1 1/8 x 3 5/8 Butterfly Bijou Designer Series Paper, adhere to the Basic White
Cut (2) 1 3/8 x 2 5/8 Mint Macaron, adhere to the short sides of the box
Cut (2) 1 1/4 x 2 1/2 Basic White, adhere to the Mint Macaron
Cut (2) 1 1/8 x 2 3/8 Butterfly Bijou Designer Series Paper, adhere to the Basic White
Punch a hole in one end and tie a ribbon, pull through the hole to create a handle to open the box
Easel
Cut 4 x 5 1/2 Mint Macaron, on the 5 1/2" side score at 2 3/4 & 4 1/8, adhere the 2 3/4" side to the top of the box
Card front
Cut 2 3/4 x 4 Mint Macaron, attach to the front portion of the easel, putting glue only on the front half. Please watch the video
Cut 2 5/8 x 3 7/8 Basic White, adhere to the Mint Macaron
Cut 2 1/2 x 3 3/4 Butterfly Bijou Designer Series Paper, attach to the Basic White
Cut 2 3/8 Basic White Stitched Circle using the Stitched Shapes Dies
Cut the butterfly from the Butterfly Bijou Designer Series Paper using the Brilliant Wings Dies
Add a bow and Opal Rounds
Inside the Card
Die cut Whisper White with the smallest Stitched Rectangle Dies, stamp greeting (Happy Thoughts) in Just Jade
Die cut Just Jade with the next larger size of the Stitched Rectangle Dies, adhere to the Basic White and attach to the inside of the card using Dimensionals. This holds the card open on top of the box
Click on the link below to find out how to purchase the starter kit and the Butterfly Brilliance Bundle.
To purchase the Starter Kit and join my team
Check out the NEW 2020-21 ANNUAL CATALOG
January - June 2021 Mini is fabulous!
Sale-A-Bration is HERE! Don’t miss the deals!
Subscribe to my
My YouTube paper crafting video channel
Follow me on
Pinterest
Follow me on
Facebook
Shop my
Online Store with February's Host Code
UAZTRNAM
Are you about to hit that $99 mark on your order (before shipping and tax)? If so, why not consider joining my team? As a member, you’ll enjoy $125 worth of products of your choice for only $99! Plus, you’ll snag a fantastic 20% discount on all your future purchases and a variety of exclusive perks from me and Stampin' Up! Dive into this exciting journey of paper crafting with us! For more information, check out my Join My Team page
We now have 3 catalogs each year, January - April, May - August, September - December. We no longer have an annual catalog. You will find all of the products in the catalogs online as well as Last Chance and Online Exclusive Products. If you want to check out the May - August Catalog click on that catalog below. If you want a paper copy, please contact me to get yours!
Check out:
Online Exclusives
May - August Catalog - Contact me to get yours!
Subscribe to my My YouTube paper crafting video channel
Follow me on Pinterest
Follow me on Facebook every week for Stampin' Tell Tuesday
Shop my Online Store