
SNAILED IT POP & TWIST CARD
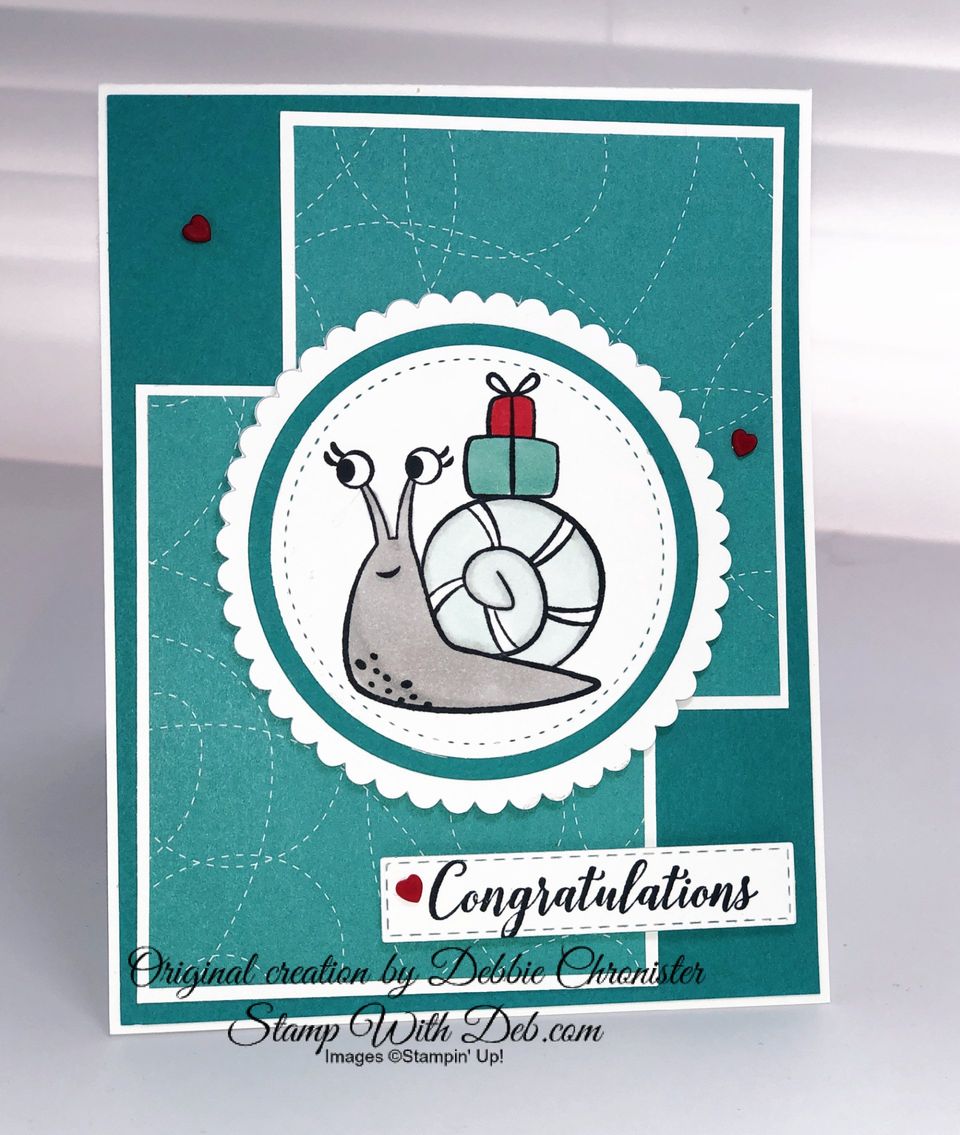
This is a fun card to give. I have always liked the look of these cards I just struggled to make them the same every time. So, I decided that it was time I figured out this card and I am glad I did. There were score lines where they really didn't need to be and I didn't like them. They were so obvious to me and there really wasn't any way to cover them. So even if you have done this fun fold card before, try my new instructions. Let me know if you have any problems. I have a video below to show you just how I did this.
INSTRUCTIONS
Card Base
Cut 4 1/4 x 11 Basic White, score at 5 1/2
Cut 4 1/8 x 5 3/8 Bermuda Bay
Cut (2) 3 x 3 1/2 Basic White
Cut (2) 2 7/8 x 3 3/8 Snail Mail Designer Series Paper, adhere to 3 x 3 1/2 Basic Whites, adhere to Bermuda Bay
DO NOT ATTACH TO THE BASIC WHITE CARD BASE!!
Cut 3" Basic White scalloped circle using the Layering Circle Dies
Cut 2 5/8" Bermuda Bay circle using Layering Circle Dies
Cut 2 3/8" Basic White stitched circle using the Stitched Shapes Dies, stamp and color the snail and layer with the other circles
Cut 2 1/2 x 1/2 Basic White stitched rectangle using the Stitched Rectangle Dies
Stamp Congratulations from Happy Thoughts in Tuxedo Black
SET THIS ASIDE. THIS WILL BE THE LAST THING WE DO

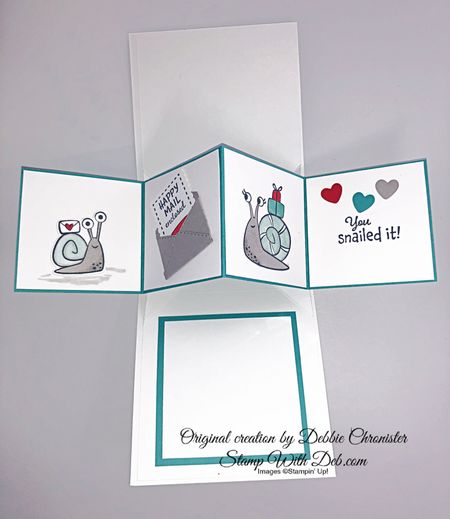
Folding Mechanism
Basic White 8 1/2 x 11
With 11" side a top, score @ 4 1/4, 5 1/2 & 6 3/4 after scoring cut off 1/8" from each end
Rotate so the 8 1/2" side is at the top. Line up at 2 1/4 and cut above and below the score lines
Line up at 4 1/4 score ONLY BETWEEN THE SCORE LINES
Line up at 6 1/4 and cut above and below the score lines
Rotate so the 11" is at the top and cut out the sections on each corner, you should end up with a cross
With a pencil mark 3/4" down from the cut out corner (look at the diagram) and the center intersection
Score from the 3/4" marks through the center to the mark on the opposite side, fold to look like a house
Panel
Cut 2 3/4 x 11 Bermuda Bay, score at 2 3/4, 5 1/2, 8 1/4, fold valley, mountain, valley
Cut (4) 2 5/8 x 2 5/8 Whisper White, stamp and color images, adhere to the Bermuda bay panel
Assembly
Fold folding Mechanism into house like shape and adhere to the inside of the card leaving an edge all the way around. Fold into the house shape and put glue on one side. Be sure the tip is close to the fold line but allows the card to fold. Place it on one side of the 4 1/4 x 11 card base. Put glue on the other side that is now facing you and close the card front down onto it. Let it dry.
Put glue on the left side on the BOTTOM portion of the folding mechanism.
Line up the first section of panel on the left with the score line on the folding mechanism, center top to bottom. Glue there.
Line up the last section of the panel, on the right, with the score line on the folding mechanism, center top to bottom.
Put glue on the TOP portion of the folding mechanism and glue there.
Test! it may be a little stiff at first but the more it is opened and closed the better it works
Cut 3 1/4 x 3 1/4 Bermuda Bay
Cut 3 x 3 Basic White, adhere to the Bermuda Bay and attach to the bottom area of the card
I finished off with the Resin Hearts
Below are the products I used to create this cute card
Check out the NEW 2020-21 ANNUAL CATALOG
January - June 2021 Mini is fabulous!
Sale-A-Bration is HERE! Don’t miss the deals!
Subscribe to my
My YouTube paper crafting video channel
Follow me on
Pinterest
Follow me on
Facebook
Shop my
Online Store with February's Host Code
UAZTRNAM
Are you about to hit that $99 mark on your order (before shipping and tax)? If so, why not consider joining my team? As a member, you’ll enjoy $125 worth of products of your choice for only $99! Plus, you’ll snag a fantastic 20% discount on all your future purchases and a variety of exclusive perks from me and Stampin' Up! Dive into this exciting journey of paper crafting with us! For more information, check out my Join My Team page
We now have 3 catalogs each year, January - April, May - August, September - December. We no longer have an annual catalog. You will find all of the products in the catalogs online as well as Last Chance and Online Exclusive Products. If you want to check out the May - August Catalog click on that catalog below. If you want a paper copy, please contact me to get yours!
Check out:
Online Exclusives
May - August Catalog - Contact me to get yours!
Subscribe to my My YouTube paper crafting video channel
Follow me on Pinterest
Follow me on Facebook every week for Stampin' Tell Tuesday
Shop my Online Store