
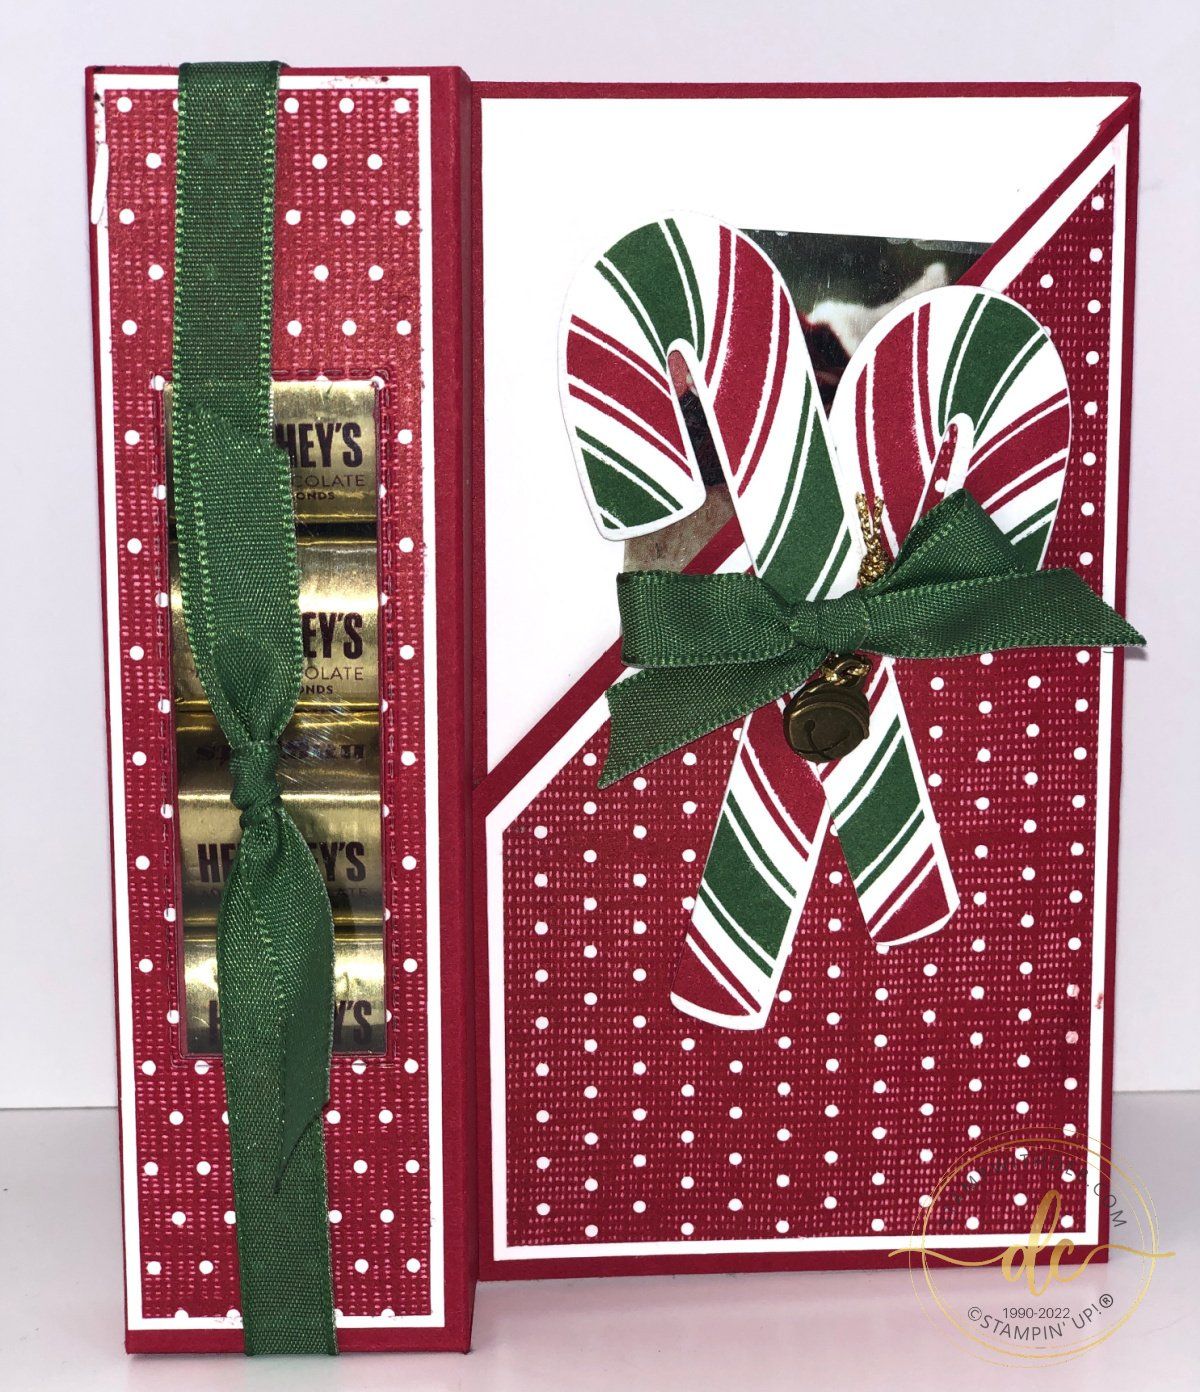
CANDLE/CANDY POCKET CARD
Video in progress
This is a candle holder or candy holder Pocket Card. It could really be used for a lot of things. I saw it online and thought I would give it a try using some of our papers. I am sorry to say I don't know who created the one I saw but she would not give out the pattern, so I went to work and created what I considered a relatively easy pattern. If you are comfortable with boxes you won't have any problems. Her box was 1-1/2 x 1-1/2, mine is 1-1/2 x 3/4. I have created 2 patterns to help you. One has measurements the other shows the areas that are cut out.
I started with a 7 1/2 x 11" Real Red, with 7 1/2" side at top score at 1/2, 1-1/4 & 6 3/4
Turn the cardstock over, with the 11" side is at top, and 6 3/4" score line along the top score at 3", 7 1/2, 8 1/4, 9 3/4 & 10 1/2, on the 6" line score down to the 2nd intersecting score line, flip over and score down to intersecting score line

Cut according to the photo shown below

Let's do one more cut for the panel on the far right. . .
Cut 2 7/8 x 5 3/8 Basic White
Cut 2 3/4 x 5 1/4 Designer Series Paper, place a pencil mark at 3" on the DSP, line up the Basic White & DSP on the front panel of card base centering them from side to side, bring them all the way to the top of the card panel and cut all three at once from the top of the fold to the 3" mark. You will need a heavy duty cutter. Or you can cut 2 and line up the 3rd and give it a shot. I found that I did better if I did all three at once. Then if the line wasn't straight at least it was that way on all of them and they matched! Watch the video to see what I am talking about.
Let's go on. . .
Cut 1 3/8 x 5 3/8 Basic White
Cut 1-1/4 x 5 1/4 Designer Series Paper, adhere to Basic White, using the Stitched Rectangle Dies cut an opening in these two, place over the 3rd panel from the left and trace the opening, cut with paper trimmer
Cut 1-1/4 x 4 Window Sheet, adhere to panel on Box over the opening, adhere the DSP & Basic White panel over top to hide the Window Sheet edges
Burnish the score lines with a Bone Folder, put adhesive on the 1/2" section and adhere, in the video I show you an easy way to do it and be sure it is in the right place
Cut 2 7/8 x 5 Basic White, adhere to second panel, be sure you have already closed the box on the left
Close the right panel over onto the next panel to form a pocket, put Tear N Tape on the bottom and left edge. Do not tape the cut angle!
Attach the Basic White and DSP that you cut earlier for the third panel on the front
Die cut the Candy Canes from the DSP, attach to the front
Feed the Flat Jingle Bell Trinkets to Gold Cord, attach to the ribbon
Tie a bow and attach to the Candy Canes with a Mini Glue dot.
Fill the box with candy bars, Tea Light Candles, Hershey Nuggets, I am sure you can find many things to fill the box. Since you closed it in you could put small candies in and not worry about them falling out the opening, tie the Garden Green Ribbon around and tie a knot
This will not go into an envelope! You could put a gift card in the pocket
Are you about to hit that $99 mark on your order (before shipping and tax)? If so, why not consider joining my team? As a member, you’ll enjoy $125 worth of products of your choice for only $99! Plus, you’ll snag a fantastic 20% discount on all your future purchases and a variety of exclusive perks from me and Stampin' Up! Dive into this exciting journey of paper crafting with us! For more information, check out my Join My Team page
We now have 3 catalogs each year, January - April, May - August, September - December. We no longer have an annual catalog. You will find all of the products in the catalogs online as well as Last Chance and Online Exclusive Products. If you want to check out the May - August Catalog click on that catalog below. If you want a paper copy, please contact me to get yours!
Check out:
Online Exclusives
May - August Catalog - Contact me to get yours!
Subscribe to my My YouTube paper crafting video channel
Follow me on Pinterest
Follow me on Facebook every week for Stampin' Tell Tuesday
Shop my Online Store