Christmas Sampler
Here is a Sampler made from several of the new stamp sets in the Stampin' Up! Holiday Catalog.
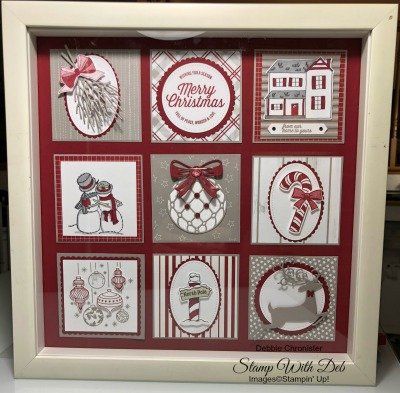
It has been a while since I have done one of these but we had so many great stamp sets in the 2018 Stampin' Up! Holiday Catalog. This gives you a little sample of what is inside while making a beautiful decoration for your home. This started out as 6 panels and when I couldn't find a frame to make it work I had to add 3 more and make it a 12 x 12.
I started with a 12 x 12 piece of Cherry Cobbler cardstock. Each of the smaller pieces starts on a 3 1/4 x 3 1/4 piece of Gray Granite

Square #1
In the Woods Framelits Dies #147919 (HC pg.27)
Wishing You Well #147864 (HC pg.35)
Layering Oval Thinlits #141706 (AC pg.218)
Measurements:
3 1/4 x 3 1/4 Gray Granite
3 1/8 x 3 1/8 Twinkle Twinkle DSP #146284 (AC pg.189)
2 3/4 x 1 7/8 Whisper White Oval
3 x 2 Cherry Cobbler Scallop Oval
2 x 3 1/2 (2) Granite Gray
2 x 3 Whisper White
- Stamp the bow from Wishing You Well on the 2 x 3 Whisper White and fussy cut around it. Unfortunately it doesn't have a die.
- I love this bow it Stampin' Up!'s Distinktive Stamps. They create different opacities in a simple stamped image for realistic depth and intensity.
- Cut the Whisper White Oval and the Cherry Cobbler Scallop Oval using the Layering Ovals Framelits
- Cut the branches from the 2 x 3 1/2 Granite Gray
- Use a Dimensional to attach the bow to the branches and glue dots to attach the branches to the white oval

Square #2
Farmhouse Christmas #148478 (HC pg.13)
Layering Circle Framelits #141705 (AC pg.218)
Stitched Shapes Dies #145372 (AC pg.220)
Measurements:
3 1/4 x 3 1/4 Gray Granite
3 1/8 x 3 1/8 Festive Farmhouse DSP #147820 (HC pg.13)
2 1/2 Whisper White Circle
2 3/4 Cherry Cobbler Circle
- Cut the Whisper White circle using the Stitched Shapes Dies
- Cut the Cherry Cobbler Scalloped Circle using the Layering Shapes Dies
- Stamp the greeting on the Whisper White Circle in Cherry Cobbler

Square #3
Farmhouse Christmas Bundle #149941 (HC pg.13)
Corrugated Dynamic Textured Impressions Embossing Folder #148206 (HC pg.13)
Measurements:
3 1/4 x 3 1/4 Gray Granite
2 3/4 x 3 Gray Granite
3 1/8 x 3 1/8 Festive Farmhouse DSP #147820 (HC pg.13)
3 1/4 x 3 1/4 Whisper White
1 x 3 Whisper White
- Emboss the 2 3/4 x 3 Granite Gray using he Corrugated Impressions EF
- Stamp the house on the Whisper White with Tuxedo Black Momento Ink
- Cut the house using the dies that came with the bundle
- Color the house with Smokey Slate Combo and the Cherry Cobbler Dark Stampin' Blends
- Stamp the greeting in Gray Granite and punch with the Classic Label Punch #141491 (AC pg.210)
- Use the Faceted Dots #146910 to the label
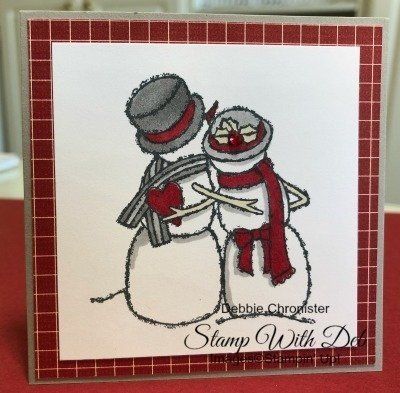
Square #4
Spirited Snowmen #148072 (HC pg.38)
Measurements:
3 1/4 x 3 1/4 Gray Granite
3 1/8 x 3 1/8 Festive Farmhouse DSP #147820 (HC pg.13)
2 3/4 x 2 3/4 Whisper White
- Stamp the Snowmen using Tuxedo Black Momento Ink
- Color with Smokey Slate, Cherry Cobbler & Crumb Cake Stampin' Blends
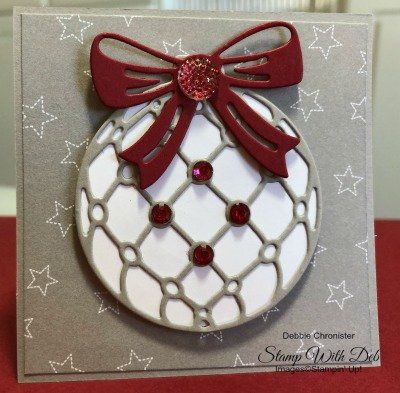
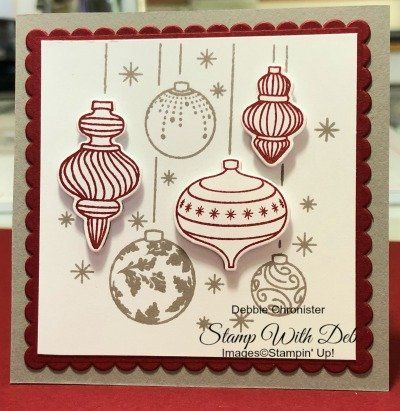
Square #5
Detailed Baubles #147924 (HC pg.10)
Layering Circles Dies #141705 (AC pg.218)
All the Presents Thinlits #147917 (HC pg.16)
Measurements:
3 1/4 x 3 1/4 Gray Granite
3 1/8 x 3 1/8 Twinkle Twinkle DSP #146284 (AC pg.189)
2 3/4 x 2 3/4 Gray Granite
2 3/4 x 2 3/4 Whisper White
2 x 3 Cherry Cobbler
- Cut the 2 3/4 x 2 3/4 Whisper White using the Layering Circles Dies. Make it the same size as the ornament. Nothing should show around the edges
- Cut the Ornament out of the 2 3/4 x 2 3/4 Gray Granite
- Cut the bow from All the Presents Thinlits from the 2 x 3 Cherry Cobbler
- Color the Rhinestones and Faceted Gems with a Cherry Cobbler Dark Stampin' Blends (This will ruin the tip of the pen. Just keep it for future use. I put a label on it so I know which one it is)
- Use Stampin' Dimensionals to attach the Ornament
- Use glue dots to attach the bow to the ornament
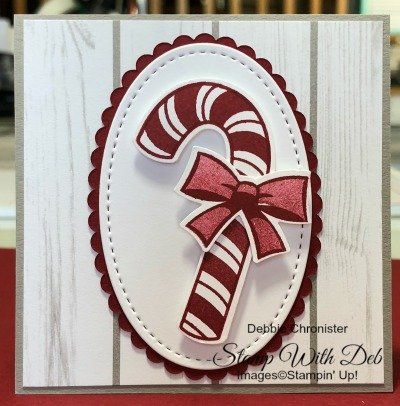
Square #6
Candy Cane Season Bundle #149937 (HC pg.20)
Layering Ovals Framelits #141706 (AC pg.218)
Stitched Shapes Dies #145372 (AC pg.220)
Measurements:
3 1/4 x 3 1/4 Gray Granite
3 1/8 x 3 1/8 Festive Farmhouse DSP #147820
2 3/4 x 1 7/8 Whisper White Oval
3 x 2 Cherry Cobbler Scallop Oval
2 x 3 Whisper White
- Cut one Whisper White with the Stitched Oval die and the Cherry Cobbler using the Layering Oval Scallop Die
- Stamp the Candy Cane and the bow and punch with the Punch in the Bundle
- Attach the Candy Cane with Stampin' Dimensionals
Square #7
Beautiful Baubles Bundle #149920 (HC pg.10)
Layering Square Framelits #141708 (AC pg.218)
Measurements:
3 1/4 x 3 1/4 Gray Granite
3 1/4 x 3 1/4 Cherry Cobbler
2 3/4 x 2 3/4 Whisper White (2)
- Cut the Scallop Square using the Layering Square Framelits
- Stamp the hanging ornaments in Gray Granite and again on the other Whisper White in Cherry Cobbler
- Die Cut the Cherry Cobbler ornaments using the dies that came in the bundle
- Attach the Cherry Cobbler ornaments with Stampin' Dimensionals
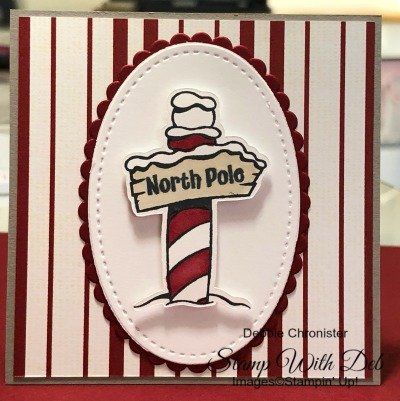
Square #8
Signs of Santa Bundle #149967
Measurements:
3 1/4 x 3 1/4 Gray Granite
3 1/8 x 3 1/8 Festive Farmhouse DSP #147820
2 3/4 x 1 7/8 Whisper White Oval
3 x 2 Cherry Cobbler Scallop Oval
2 x 3 Whisper White
- Cut one Whisper White with the Stitched Oval die and the Cherry Cobbler using the Layering Oval Scallop Die
- Stamp the sign post and the North Pole with Tuxedo Black Momento ink and color with Cherry Cobbler Dark Stampin' Blends and Crumb Cake Stampin' Blends
- Cut the post using the dies that come in the Signs of Santa Bundle
- Attach the Post with Stampin' Dimensionals
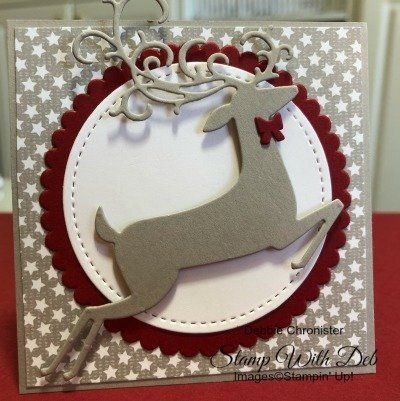
Square #9
Detailed Deer Thinlits Dies #147915 (HC pg.9)
Farmhouse Framelits Dies #147955 (HC pg.13)
Layering Circle Framelits #141705 (AC pg.218)
Stitched Shapes Dies #145372 (AC pg.220)
Measurements:
3 1/4 x 3 1/4 Gray Granite
3 1/8 x 3 1/8 Festive Farmhouse DSP #147820 (HC pg.13)
2 1/2 Whisper White Circle
2 3/4 Cherry Cobbler Circle
1 x 2 Cherry Cobbler
- Cut the Whisper White circle using the Stitched Shapes Dies
- Cut the Cherry Cobbler Scalloped Circle using the Layering Shapes Dies
- Die cut the deer from Gray Granite
- Cut the bows from the 1 x 2 Cherry Cobbler using the Farmhouse Framelits dies and put it on the deer
- Attach the deer with Stampin' Dimensionals
This is finished except to put it together. I took a piece of the cardboard that comes from the back of the Designer Series Papers. I cut a 11 1/4" square out of the center by placing it at the 3/4 inch mark and cut on each side. I use that to position my outside pieces then line up the inside pieces with those on the outside. It makes it so much easier to place them straight on the 12 x 12.
If you have any questions please do not hesitate to leave me a note or send me an email
Happy Stampin'
Are you about to hit that $99 mark on your order (before shipping and tax)? If so, why not consider joining my team? As a member, you’ll enjoy $125 worth of products of your choice for only $99! Plus, you’ll snag a fantastic 20% discount on all your future purchases and a variety of exclusive perks from me and Stampin' Up! Dive into this exciting journey of paper crafting with us! For more information, check out my Join My Team page
We now have 3 catalogs each year, January - April, May - August, September - December. We no longer have an annual catalog. You will find all of the products in the catalogs online as well as Last Chance and Online Exclusive Products. If you want to check out the May - August Catalog click on that catalog below. If you want a paper copy, please contact me to get yours!
Check out:
Online Exclusives
May - August Catalog - Contact me to get yours!
Subscribe to my My YouTube paper crafting video channel
Follow me on Pinterest
Follow me on Facebook every week for Stampin' Tell Tuesday
Shop my Online Store